Introduction to InfluxDB and Tableau Integration
Imagine you are tasked to fetch the data from an open-source database in Tableau for which there is no connector. It’s urgent and must be done at once. How would you do it?
It’s a reasonable ask… one that can’t completely be ruled out. There are plenty of organizations which make use of InfluxDB and one might actually experience a scenario in which such a demand is made.
But before we attempt an answer, a quick primer on InfluxDB is in order.
InfluxDB is a time-series database designed to handle large amounts of time-stamped data. It is an open-source database optimized for storing, querying, and analysing time-series data, such as sensor data, system metrics, and application metrics.
InfluxDB is built using a distributed architecture, which allows it to scale horizontally, as data volumes increase. It uses a SQL-like query language called InfluxQL for querying and manipulating data and supports various APIs and integrations with other tools, making it easy to integrate into your data processing pipeline.
There are two distinct ways in which you can import InfluxDB data in Tableau.
Method 1: Using Web Data Connector
Web Data Connector (WDC) is the bridge that connects the InfluxDB data with Tableau. The main purpose of WDC is to connect to the data that is accessible over the HTTP but lacks a connector. The WDC must be hosted on a web server running locally on your system, on a web server in your domain or on a third-party web server. To fulfil the task,
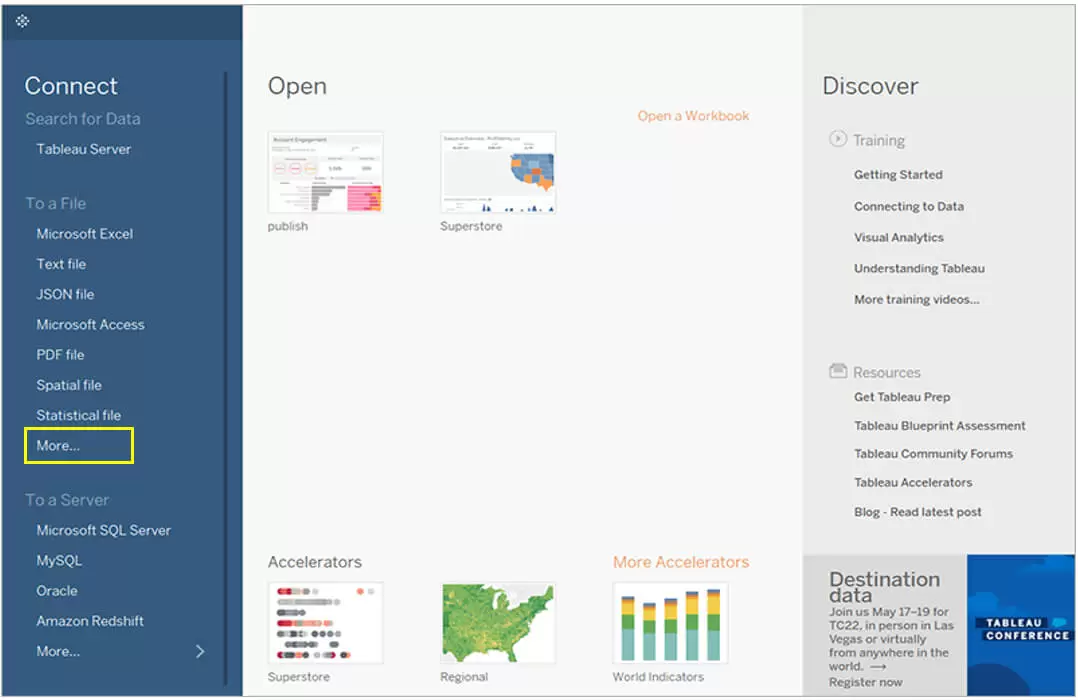
Step 1. Go to the Tableau Desktop start page and click on ‘More…’ under Server in the Connect pane.

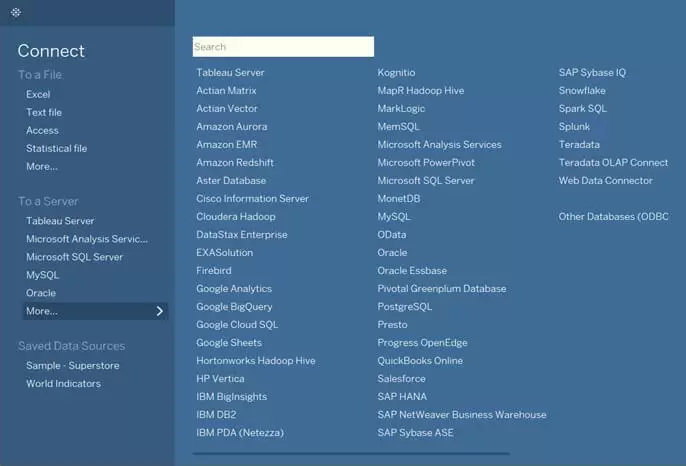
Step 2. Select Web Data Connector

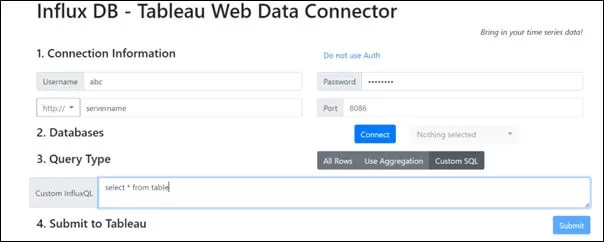
Step 3. Enter the URL of the web data connector that you want to connect to (here: https://tagyoureit.github.io/InfluxDB_WDC/InfluxDB.html).
Enter username, password, URL and the port of the InfluxDB server and click on Connect. Then select a database and select your initial query type (here: Custom SQL). Eventually click on Submit.

Method 2: Using Python
This is another way of fetching data from Influxdb and then converting it to Tableau readable format. However to do this, one must have Python 3.0 or a more advanced version of it installed on your system.
Step 1: Installing Python libraries
To check, if the libraries are successfully installed, open python terminal and type

In case of no error, we are all set to proceed with the next steps.
Step 2: Making a Connection
The next step will be to create a new instance of the InfluxDBClient (API docs), with information about the server that we want to access. Enter the following command in your REPL, replacing the values of host and port with the appropriate URL/IP address and port of your InfluxDB host. In this case, we’re running locally on the default port:

There are some additional parameters available to the InfluxDBClient constructor, including username and password, which database to connect to, whether to use SSL, timeout and UDP parameters.
If you wanted to connect to a remote host at mydomain.com on port 8086 with username myuser and password mypass and using SSL, you could use the following command instead, which enables SSL and SSL verification with two additional arguments, ssl=True and ssl_verify=True:

Now, let’s create a new database called ‘pyexample’ to store our data:

We can check if the database is there by using the ‘get_list_database()’ function of the client:

There it is, in addition to the telegraf and _internal databases I have on my install. Finally, we’ll set the client to use this database:

Step 3: Querying Data
Now that we have some data in the database, let’s try running some queries to get it back out. We’ll use the same client object as we used to write data, except this time we’ll execute a query on InfluxDB and get back the results using our client’s query() function (API docs).

Step 4: Converting the data to .tde files

And the .tde file is saved at the provided location.
Step 5: Publish the .tde file to Tableau server
1. Log in to the Tableau Cloud site with the specified site ID. You can hit this command in the command prompt window where Tableau is installed.

Options:
-s, –server
If you are running the command from a Tableau Server computer that’s on your network, you can use http://localhost. Otherwise, specify the computer’s URL, such as http://bigbox.myco.com or http://bigbox.
If the server is using SSL, you will need to specify https:// in the computer’s URL.
For Tableau Cloud, specify the URL https://online.tableau.com.
-t, –site
Include this option if the server has multiple sites, and you are logging in to a site other than the default site.
The site ID is used in the URL to uniquely identify the site. For example, a site named West Coast Sales might have a site ID of west-coast-sales.
-u, –username
The username of the user logging in. For Tableau Cloud, the username is the user’s email address.
-p, –password
Password for the user specified for –username. If you do not provide a password, you will be prompted for one.
2. Publish filename.twb(x), filename.tds(x), or filename.hyper
Publishes the specified workbook (.twb(x)), data source (.tds(x)), or extract (.hyper) to Tableau Cloud.
If you are publishing a workbook, by default, all sheets in the workbook are published without database usernames or passwords.
The permissions initially assigned to the workbook or data source are copied from the project that the file is published to. Permissions for the published resource can be changed after the file has been published.
If the workbook contains user filters, one of the thumbnail options must be specified.
Example:

If the file is not in the same directory as tabcmd, include the full path to the file.
Example

Options:
-n, –name
Name of the workbook or data source on the server. If omitted, the workbook, data source, or data extract will be named after filename.
-o, –overwrite
Overwrites the workbook, data source, or data extract if it already exists on the server.
-r, –project
Publishes the workbook, data source, or data extract into the specified project. Publishes to the “Default” project if not specified.
–parent-project-path
Specifies the name of the parent project for the nested project as specified with the -r option. For example, to specify a project called “Nested” that exists in a “Main” project, use the following syntax: –parent-project-path “Main” -r “Nested”.
–db-username
Use this option to publish a database username with the workbook, data source, or data extract.
If you connect to the data through a protected OAuth connection and access token, us the –oauth-username option instead.
–db-password
Use this option to publish a database password with the workbook, data source, or extract.
–save-db-password
Stores the provided database password on the server.
–oauth-username
The email address of the user account. Connects the user through a preconfigured OAuth connection, if the user already has a saved access token for the cloud data source specified in –name. Access tokens are managed in user preferences.
For existing OAuth connections to the data source, use this option instead of –db-username and –db-password.
–save-oauth
Saves the credential specified by –oauth-username as an embedded credential with the published workbook or data source.


 Media Coverage
 Press Release
