 Media Coverage
 Press Release
Streamlining Data Processing: Splitting Files into Equal Outputs Using Alteryx
Enhancing Workflow Efficiency: Alteryx Techniques for File Splitting and Distribution
Optimizing Output Distribution: Alteryx Methods for Generating Equal File Outputs
Data staging is a very important phase during database upgrades or database migration or for use in parallel processing. Some of the data architects do not load the entire data directly into the new system. They usually take data in the form of SQL scripts. Some take the dump of entire data either as JSON format or Text format. Then the file is cut into multiple pieces so that the new data warehouse can be populated in small incremental steps. This helps in identifying errors and is also easy for debugging if the process fails at any stage. If the entire data is loaded at once and if the process fails at any point due to unforeseen circumstances, it leads to lot of resource loss. It might also compromise data quality and integrity.
In this blog, we will be discussing four methods to split a sample file into equal pieces. This is a real case scenario that was encountered when migrating into Snowflake. A huge dataset in the order of may be a billion rows was to be imported. Initially, the entire data was tried, but it was taking a huge amount of time. So, the plan was to chop the data into chunks and load the smaller datasets individually each consisting of 10 – 25 million rows which proved to be a little effective in terms of file management at the same time was easier for monitoring.
Understanding File Splitting: Key Concepts and Considerations with Alteryx
Step-by-Step Guide: Implementing Alteryx Techniques for Splitting Files
Alteryx Features: Leveraging Tools for Efficient File Splitting and Distribution
Practical Applications: Real-world Examples of Alteryx in Splitting Files
Exploring Alteryx Tools: Techniques for Efficiently Splitting Large Files
Advanced Data Transformation: Tips for Optimizing File Splitting with Alteryx
Alteryx Best Practices: Maximizing Efficiency in File Splitting and Distribution

To keep it simple, we will be using a sample file with 10K rows. We will use tools within Alteryx to cut the data into pieces for output.

The three methods we will be trying will have different approaches but the result will be same. The first two methods will first determine the total number of records (in this case we know it is 10000) and focus on splitting it into files of 2000 rows each resulting in 5 files using a flag for the split identifier. The last method will focus on the number of output files required i.e. 5 in this case and populate each of the files equally which would result in 2000 rows each. The number could be anything because the settings will split the data into equal pieces.
Before we jump into the methods, let us have a brief look at the tools being used. Alteryx is a very powerful software which offers wide variety of specialized tools (palettes). But in this blog, we will be using very simple tools. That’s right! Simple tools can do wonders.

1) Input Data – The tool is used to bring data into the workflow either from a file or a database

2) Select tool – This tool is optional. But good to use it in a flow, so that we can reduce the information. The tool is used for removing unwanted fields, renaming, rearranging fields and changing the data type.

3) Record ID – The tool assigns unique identifier for every row like an index.

4) Formula – The tool is used to update fields using some expressions, calculations and operations.

5) Tile – The tool assigns values based on ranges. It is very helpful to segment the data into buckets.

6) Sort – The tool arranges records in alphabetical or numeric order either high to low or low to high based on the required fields.

7) Browse – Optional. But good to use it to verify values. The tool provides complete view of the underlying data.

8) Count Records – Optional. The tool provides the number of records passing through the workflow

9) Multi-Row Formula – It is an advanced Formula tool that helps in using row level values from the previous and future record for calculations.

10) Output Data – This is the most important tool for this example. The tool writes all the contents at the end of the workflow into a file or a database
Method 1
This is the most common method used to create split files.
1) Starting with the Input tool for the required Excel file.

2) Using the Browse tool to verify the number of rows. Assuming we don’t know the number of rows. Also, this will give us the general idea about the data.

OR, we can use the Count Records tool to find the number of rows in the dataset. Also, with this tool, we don’t have to read the entire underlying data.

3) Now that we know the total number of rows, we are ready to split it into 5 files of 2000 rows each. But the question is how to identify 2000, 4000, 6000, 8000 and 10000. Most data sets have an Index field especially Relational databases have a primary key. But for this example, we will create a Row ID field using the Record ID tool.

In this case, a Select tool is used to rearrange the field order. Row ID is the first field. This is the field in focus.
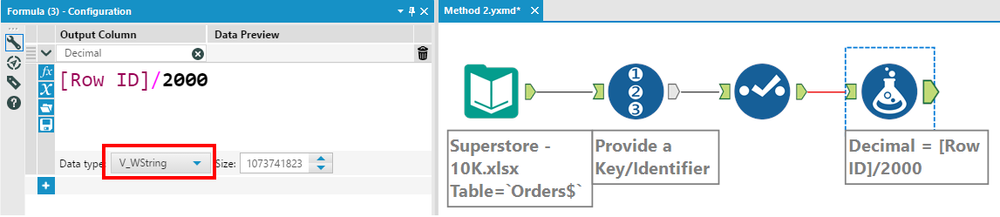
4) Next, we need a calculation in the formula tool. This is a must step as it will give us the required feature for the next calculation. Both calculations can be executed at once. But we are splitting into different steps. This is where the number of rows per file will come in. So, we will be dividing the Row ID field with 2000 which is the file size (Not the size as capacity, here number of rows) we need. We can call this field any name. It can be any data type. But we shall make a float or double for this method. This will be helpful in the next step.


Now, we have decimal values at the exact segments required. We need a way to tell Alteryx to cut the file into those specific pieces.
5) Next, we need to prepare an identifier for the split. So, we shall use another formula with the CEIL function. The CEIL function is like a round function but only provides the next closest integer value (next nearest higher whole number). Eg. Ceil(0.7) = 1, Ceil (35.23) = 36.

So, the Split ID for the first 2000 rows will be 1, next 2000 rows will be 2 and so on.

6) Now for the last step, we need to output the data into different files using the Split ID field. For this example, we will be using CSV as the output file format.


The final workflow looks like this:

Method 2
This method has some of the same initial steps. The later steps are a little complicated and the approach is longer. The final aim is to arrive at a field which is the Split ID. The reason to use some additional steps is to just understand the concept and these concepts can be used elsewhere.
Also, it is for selfish reasons because this is the first solution I found out after finding simpler ones.
1) Starting with the Input tool for the required Excel file.
2) Using the Browse tool or Count Records tool to verify the number of rows.
3) Now that we know the total number of rows, we are ready to split it into 5 files of 2000 rows each. Since we need an Index field, we shall use the Record ID tool.

4) Next, we will introduce the same calculation that was done in Method 1. But this time, we shall keep it as a String data type. This will help in the future steps.

Here, we have to remember that though this column looks like a decimal number, it is still in the string format.
5) In this step, we will use the string properties. We shall focus on the ‘.’ (dot) as a delimiter. We can use the Parse tool palette. But to keep it simple, we will use a formula.
So, the idea is to look at only rows that have whole numbers (i.e. without the decimal ‘.’). We will give a simple flag for identification.


6) Now, recollecting the steps from Method 1, we need a Split ID for each of the 2000 rows. Essentially, we need to fill for the last value in the set. For this we need to use Multi-Row Formula tool that can take values from he previous or future row. But I personally have not been able to find a way to fill the above values. It is easy to fill top-down than bottom up. So we will first Sort in descending order of Row ID.


7) Now that the data is ready in the required format, we can fill them downwards using the Multi-Row Formula tool.

So, the formula would say that if there is no value in the Current field, pick from the previous row and the new field that is getting populated will populate for the future rows.
To go a little in detail. Let us consider the first 3 rows,
a) The first row has a Row ID of 10000 and Without Decimal value 5. So, according to the formula, since this row has an active value, Split ID field will pick that value
b) The second row has a Row ID of 9999 and Without Decimal value of ‘NA’. So according to the formula, since this row is treated as Null, it will pick the Split ID value from the previous row (i.e. Row – 1) which is 5
c) The third row will follow the same concept until it reaches 4. The process continues for the entire data set.


8) That is all we needed. We are ready to write them to different files. If needed, we can sort it back to order. Also, we can clean up some unwanted fields.

The final workflow looks like this:

Method 3
This is the easiest method used to create split files. It involves only a couple of steps. As mentioned before, in this method we cannot create files based on number of rows, we can only divide them by size. Whatever is total number of records, this method will cut the file into equal pieces as per the number of files required.
1) The first step is same. We need to bring the data on to the workflow.

2) The second step would be to create a Row ID. This step is optional as this step has no significance to this method. But it is important because, when the files are brought together, the Index field will be missing. To help us in debugging, we will introduce the Record ID tool.

3) Next, the most important step. We will introduce the Tile tool. There are 5 methods. We will use the ‘Equal Records’ method. Next, we need to specify the number of tiles. Every other setting option can be left default.


This is very straight forward. We are telling Alteryx that we need 5 tiles of equal number of rows from this data. That is all, we have our answer ready. This flow will give us 2 fields. Tile_Num which is the Split ID for the buckets of data and Tile_SequenceNum which is an Index field for each bucket. We are only interested in Tile_Num.


4) Now for the last step. We need to output the data with Tile_Num as the split field.

The final workflow looks like this:

Method 4
This method is very similar to the previous method. More like an alternate version of Method 2. Most of the steps will be same except for the calculations. The final goal is to arrive at a Split ID field. Instead of using the division operator, we will be using a MOD function. The MOD function will provide the remainder after the division. It only provides the integer value. For example. 10/3 will be 3.33. MOD(10,3) will be 1 which 10 – 9 (10 can be divided 3 times by 3. Remainder is 1). The best part of Alteryx is that there will be multiple solutions to the same problem.
1) Starting with the Input tool for the required Excel file.
2) We know the total number of rows, we are ready to split it into 5 files of 2000 rows each. Since we need an Index field, we shall use the Record ID tool.
3) Next, we will introduce the calculation with MOD function. We can keep the data type as String or convert it to Number. In this example, we are using Integer.

We can see that at every 2000th record, the value becomes 0 because there is no remainder.


4) Next, we need to pick only the values where the remainder is 0. We can write any type of complex calculation. To keep it simple, we will pick the RowID value itself and rest of the rows as ‘NA’ flag.


5) As per the steps of Method 1, we need a Split ID for each of the 2000 rows. For this we need to use Multi-Row Formula tool that can take values from the previous or future row. So, we will first Sort in descending order of Row ID.


6) The data is ready in the required format, we can fill them downwards using the Multi-Row Formula tool. The formula would say that if there is no value in the Current field, pick from the previous row and the new field that is getting populated will populate for the future rows. The same concept used in Method 2.


7) The data is ready to be written into multiple files. If needed, we can add some cleaning steps.

The final workflow looks like this: