Unveiling Business Age Calculation: Alteryx Methods and Best Practices
Mastering Data Analysis: Calculating Business Age in Alteryx
Empower Your Insights: Effective Strategies for Business Age Calculation in Alteryx
Age calculation in one of the most widely used features in reports. All tools by default provide Calendar Age between a Start Date and an End Date through Date Difference or Time Difference type of functions. But end users in many cases request for the difference between two dates in Business days.
This blog aims at calculating this value in Alteryx. The idea is to eliminate the weekends (Saturdays and Sundays). Here holidays are not considered. The same logic can be applied to a dataset that has holidays too. Some countries might have different weekends that need to be eliminated. The logic can be tweaked to suit such needs.
The concept is used in many different situations. If it is Supply Chain, we can use it to find the time required in Business days to refill the stock or inventory. If it is Ecommerce, we can use it to find the time difference between Order Date and Delivery Date. If it is Trade, the calculation can be used to find the time taken for a trade to reach settlement from the initial stages. If it is USCIS, the calculation can be applied to find the time to process an application as it progresses through different stages. If it is movies, the calculation can be used to find how long it took to shoot and complete the post production work. The list goes on and on. The bottom line is every business needs this kind of a calculation.
There are many blogs and community posts that deal with this calculation where most methods focus on subtracting the weekends from the Calendar days. All of those are successfully used. In this blog, we will try something different. We will try to simulate a SQL type approach where a Date function is activated when the Date Dimension (lookup file) containing all dates is used to identify the business days.
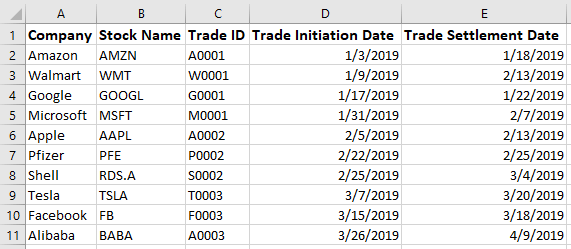
We will approach it like a use case. We have a very simple dataset which has 10 rows of information. There is Stock Name, Trade Initiation Date and Trade Settlement Date. We need to find the number of business days (not calendar days) it takes to settle a trade. (Number of weekdays between Trade Initiation Date and Trade Settlement Date)
Understanding Business Age Calculation in Alteryx: A Comprehensive Guide
Implementing Business Age Calculation Methods in Alteryx
Advanced Techniques: Optimizing Business Age Calculation in Alteryx
Streamlining Data Analysis: Best Practices for Business Age Calculation in Alteryx
Before we jump into the steps, let us quickly look at the tools being used. Alteryx is a very powerful software which offers a wide variety of specialized tools. We need only a few.

1) Input tool – This tool imports data into the workflow from a file or database.

2) Text Input tool – This tool allows the user to manually create tables within the workflow. It is very useful when creating lookup files.

3) Select tool – This tool allows for renaming, removing, reordering columns and changing data type as needed for the data in the workflow. It is one of the most widely used tools in the workflow.

4) Generate Rows tool – This tool allows for the creation of a series of numbers or IDs or dates based on the specified loop expression.

5) Formula tool – This tool is used to create new columns or update existing columns using formula expressions (functions).

6) Multi-Row Formula tool – This tool is an extension of the formula tool that allows the combination of current row, previous row and next row in a calculated formula.

7) Running Total tool – This tool is used to calculate the cumulative sum of a number. This tool can be used as an alternative for Multi-Row Formula tool in this example.

8) Join tool – This tool is used to combine data from two tables/streams based on a common field.

9) Browse tool – This tool is used to check the output of data in the workflow before writing it into a file or database. It can be used to verify data after a major step in the workflow.
Now, we will go into all the steps. As and when we approach some crucial steps, the concepts will be discussed. Here we are using Alteryx 2019 version. The steps will work same in any older version that supports the aforementioned tools.
1) The first step would be to bring the Trade transactions data into the workflow using the Input tool.
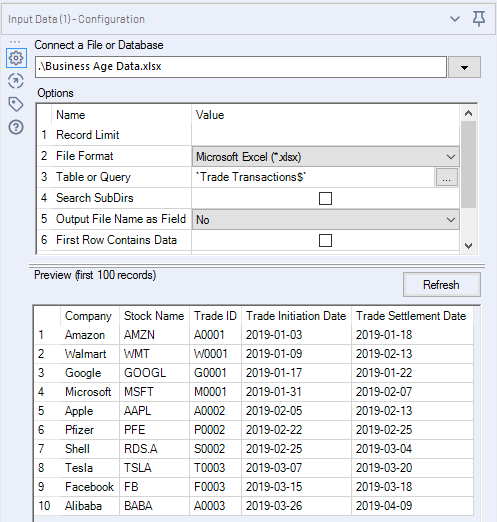
2) We can use the Select tool to make sure the data type is correct for the two date fields. If not, we will have to use the DateTime tool to parse them to the right format.

Since the date fields are formatted in the excel file, the flow will read them in the “YYYY-MM-DD” format.
3) Now let us use the Formula tool and find the number of Calendar days between the two dates. This step is being done to show the difference with the Business Age field that will be created later.
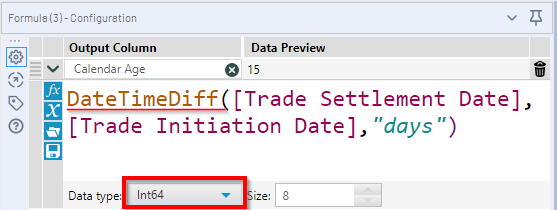
The formula has options to use exiting field, functions and some saved expressions. The DateTimeDiff() function calculates the difference between the End Date and Start Date based on the Date Part provided (Days, Months, Years etc.)
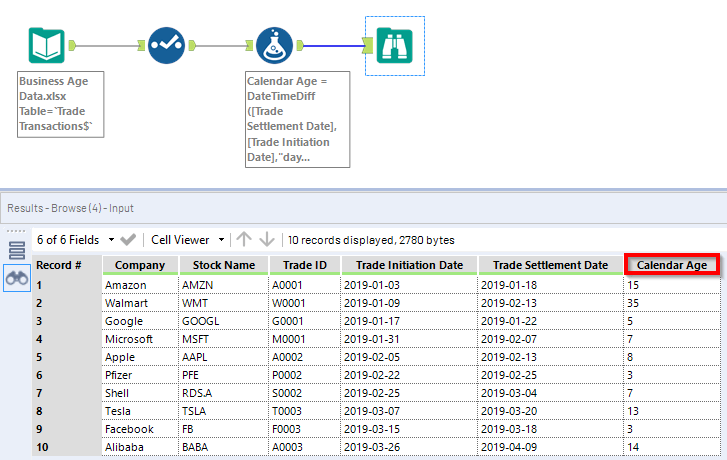
To take an example of Row 1 for AMZN. The Initiation Date is Jan 03 which is a Thursday and the Settlement Date is Jan 18 which is a Friday, two weeks later. So, the number of days is 15. But we need the working days only which is 11. We need to subtract two weekends i.e 4 days. This concept is discussed in the Alteryx community and other blogs. Instead of doing the calculation to find the number of weeks between them and then use them for subtraction, we will prepare a data set that can be used for the lookup.
4) We will create a lookup file that consists of only Dates using the Text Input file. Here we need a Start Date and End Date. Any arbitrary date will work. The idea is to generate a sequence of dates between the Start and End. The dates in our transactions file should be within this range. To keep it simple, we will take a Start Date in the past and the End Date in the future. End Date can also be Today. But some businesses look for future transaction dates which need to be taken into consideration.
For the Start Date, we will pick Jan 01, 2018 and for the End Date, we will pick Dec 31, 2019, which is two full years.
We will type the dates in YYYY-MM-DD format.
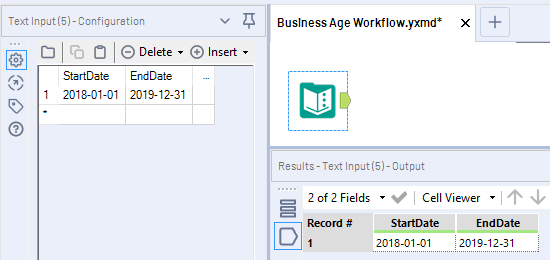
5) Now we need to generate a sequence of Dates. The new Date column will have unique dates from Jan 01, 2018 to Dec 31, 2019. We will be using the Generate Rows tool. We need to make sure we are generating Date data type.

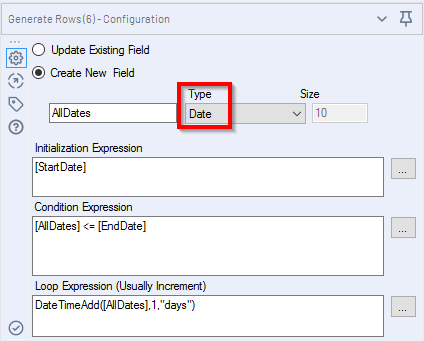
The Generate Rows works like a FOR Loop expression used in programming languages
For(i=1; i<= n; i++)
There are 3 parts to this tool. Here we are generating a new field
a) Initialization expression – This is the starting point of the loop expression. Here we want to start with Jan 01, 2018 (Start Date).
b) Condition expression – This is where it is specified how many times the loop has to be executed. Here we want the new field to be populated until it reaches Dec 31, 2019 (End Date).
c) Loop expression – This is where we mention what calculation to be executed in the loop. Here we need an increment by 1 day for the new field i.e. we need everyday as a sequence of dates from Jan 01, 2018 to Dec 31, 2019. The DateTimeAdd function will increment or decrement a Date field by the number provided based on the Date Part specified.
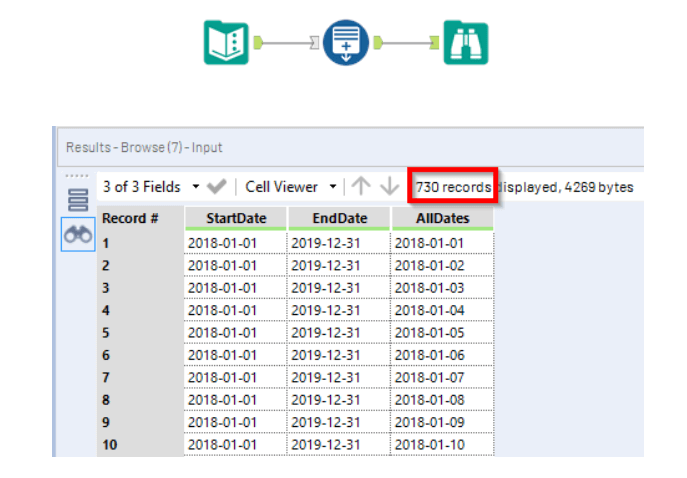
After the loop expression completes, we can see 730 dates generated
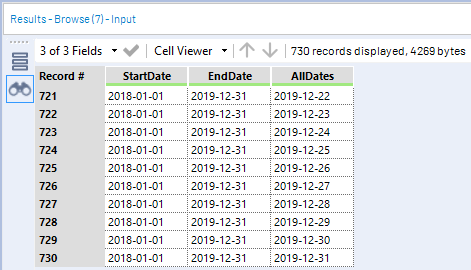
6) Now that we have unique dates, we need to generate a number for each date based on day of the week. This step will be executed in two parts. First, we need to find the day. Then the weekday will be assigned 1 and weekends will be 0. Why this format is followed, will become clearer in the next step. Also, we need to be careful about the data types in some of these steps. The DateTimeFormat function displays a date in the required format.
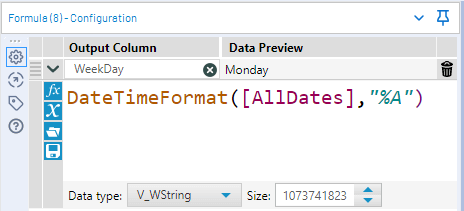
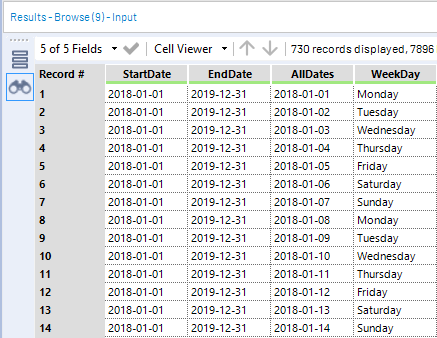
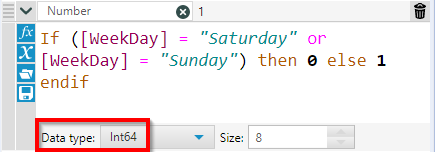
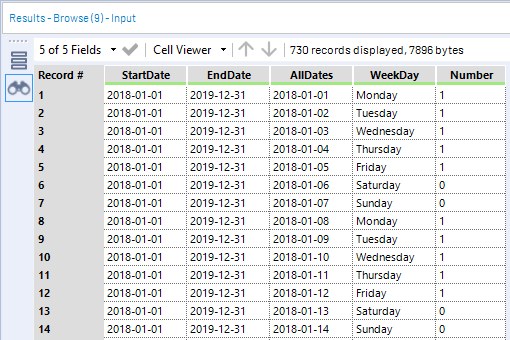
7) Next, we need to generate a unique number for each weekday (excluding Saturdays and Sundays). The idea is to create the unique number from the newly created column as a running value.
We can do it in two ways. We can either use the Multi-Row tool or Running Total tool. Both will yield the same result.
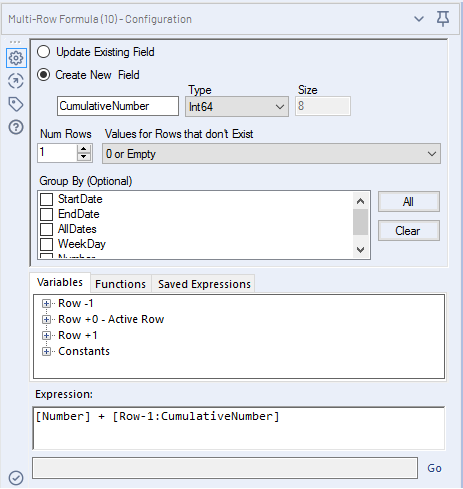
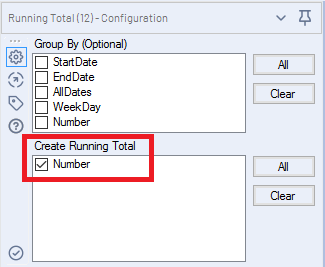
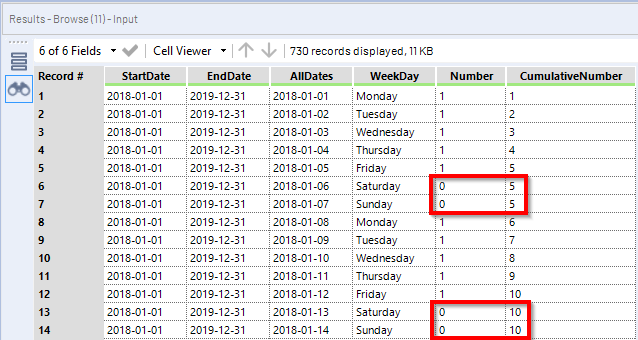
Now that we have unique number for each date, we can use this as a lookup file. This way any date can be subtracted with the actual number because the number is a progression/sequence.
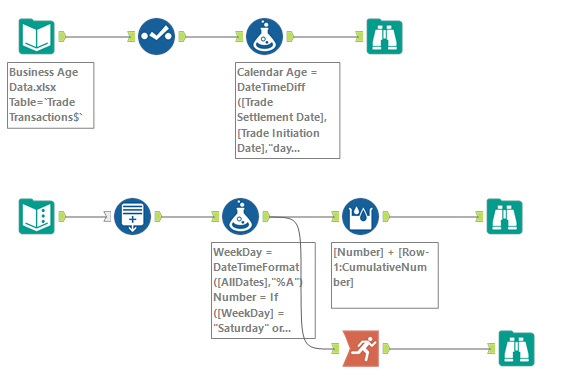
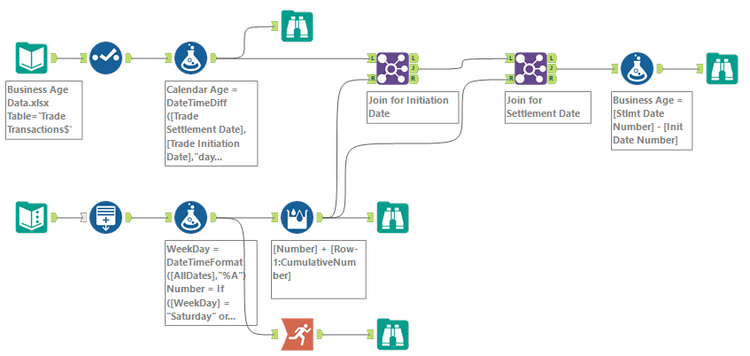
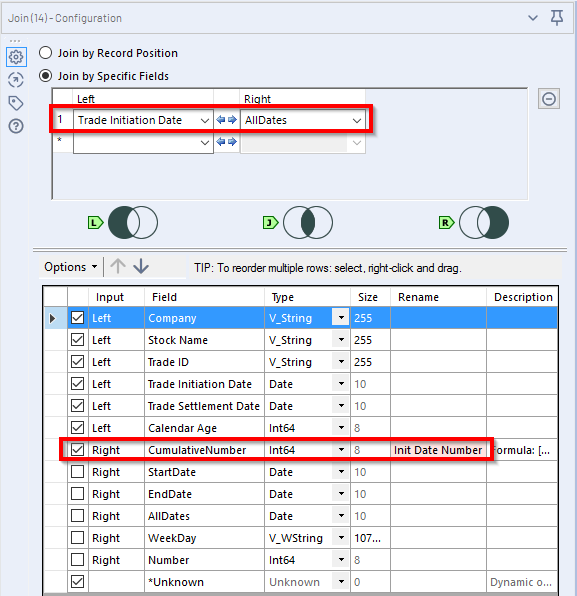
8) Now, we need to combine both the streams. Again, this step will consist of two parts. The first part will match the Date table to Trade Initiation Date and the second part will match the Date table to Trade Settlement Date.
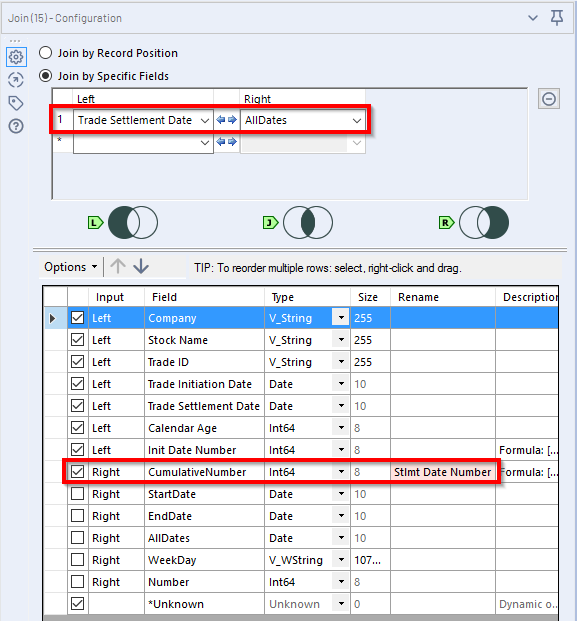

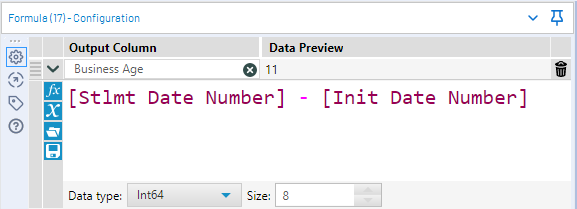
9) Now, for the last step. To find the Business Age, we just need to subtract the two Number columns (Stlmt Date Number – Init Date Number)

Harnessing Alteryx for Business Age Calculation: Strategies for Success
Maximizing Data Insights: Advanced Techniques for Business Age Calculation in Alteryx
Elevating Data Preparation: Leveraging Alteryx for Business Age Calculation
Empowering Decision-Making: Utilizing Alteryx for Accurate Business Age Calculation
The final workflow would look like this.
