Integrating Metric Insights with Power BI Cloud: A Step-by-Step Guide
Enhancing Data Insights: Connecting Metric Insights to Power BI Cloud
Streamlining Visualization: Best Practices for Metric Insights and Power BI Cloud Integration
What is Metric Insights?
Metric Insights is an operator of a business intelligence platform used to empower businesses to effectively cut through data clutter. It helps to track metrics from business intelligence tools, big data, and SaaS applications, uncovers anomalies, and notifies users of significant changes in data that requires their attention that enable clients to benefit from intelligent data-driven decisions.It is the solution that delivers a comprehensive set of BI Portal capabilities that can be scaled for large enterprise deployments. Metric Insights provides the full set of functionalities required to fundamentally transform how business users engage with analytics across the entire enterprise.
Understanding the Benefits of Metric Insights and Power BI Cloud Integration
Step-by-Step Guide: Connecting Metric Insights to Power BI Cloud
Best Practices for Establishing Connectivity Between Metric Insights and Power BI Cloud
Leveraging the Power of Data Insights: Metric Insights and Power BI Cloud Collaboration
Exploring Integration Options: Metric Insights and Power BI Cloud
Configuring Connectivity Settings: Metric Insights and Power BI Cloud Integration
Optimizing Data Visualization: Tips for Metric Insights and Power BI Cloud Users
Enhancing Collaboration: Metric Insights and Power BI Cloud Integration Strategies
What is Power BI Cloud?
Power BI is a collection of software services, apps, and connectors that work together to help you create, share, and consume business insights in the way that serves you and your business most effectively.
The Microsoft Power BI service (app.powerbi.com), sometimes referred to as Power BI online, is the SaaS (Software as a Service) part of Power BI. In the Power BI service, dashboards help you keep a finger on the pulse of your business. Dashboards display tiles, which you can select to open reports for exploring further. Dashboards and reports connect to datasets that bring all of the relevant data together in one place.
Prerequisites for Connecting to Microsoft Power BI Cloud
1). Access to Power BI Endpoints
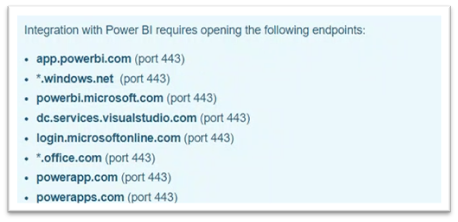
Note: These endpoints must be accessible from the Metric Insights application server.
Note: Admin access is required for the user/service account that is setting up the Azure App.
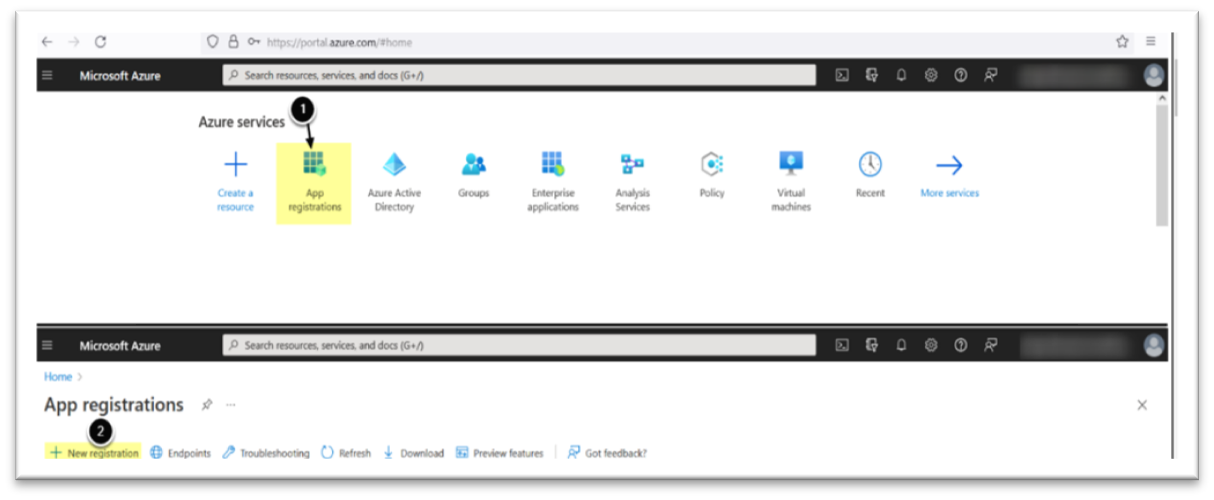
2). Access Microsoft Azure Portal
Once you open portal.azure.com move to the App registrations section followed by New Registrations as shown in the image:
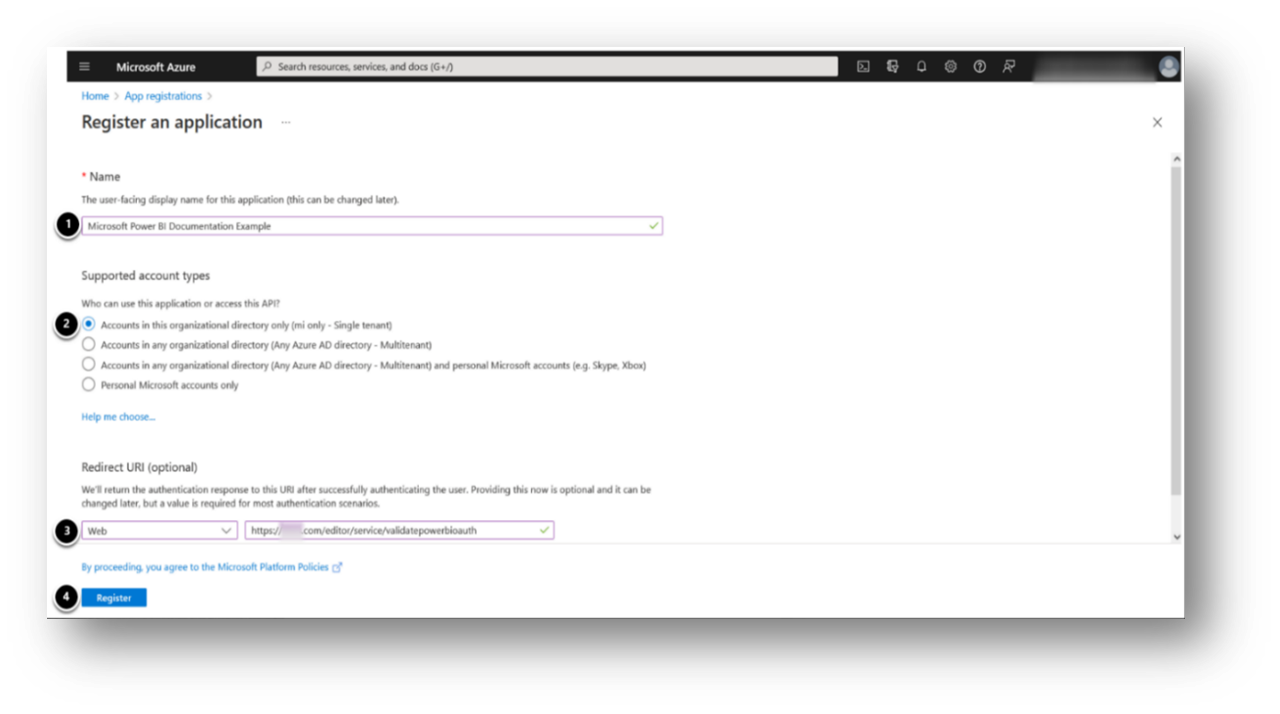
3). Enter Application Information
For registering an app under the new registrations section, we need to do the following steps:
a) Enter the Application Name ( as per your desired choice)
b) Supported account types: “Accounts in this organizational directory only (<directory name> only – Single tenant)”
c) Redirect URI: select Web, enter https://<MI hostname>.com/editor/service/validatepowerbioauth
d) Now click on the Register
Registering your application will allow you to access the Power Rest APIs and set resource permissions for your application, you can change this later in Azure Portal itself.
To follow these steps please refer to the image given below:
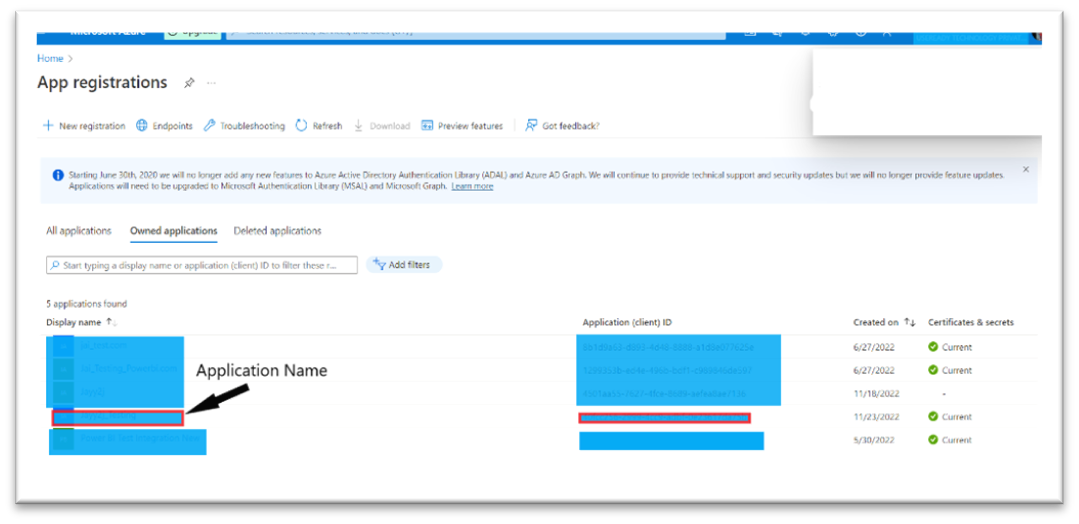
Once you have clicked on the register, your Application ID will be auto-generated, please check the name and Unique application ID of your Application in the App registrations section:
4). Adding Permissions (Power BI Service)
- Under the manage section, Go to the API Permissions tab
- Now once you have selected the API Permission tab, go to the option “ + Add a permission”
- Once you have clicked Add permission then under the request API permissions select Power BI Service
- After selecting the Power BI service click on the Delegated permissions option
- Note: Delegated permissions allow the application to access the API as the signed-in user.
- Enable the following permissions to get a list of all Power BI Apps, Dashboards, Datasets, Reports, and Workspaces respectively:
App: Read.All, Dashboard: Read.All, Dataset: Read.All, Report: Read.All,
Workspace: Read.All

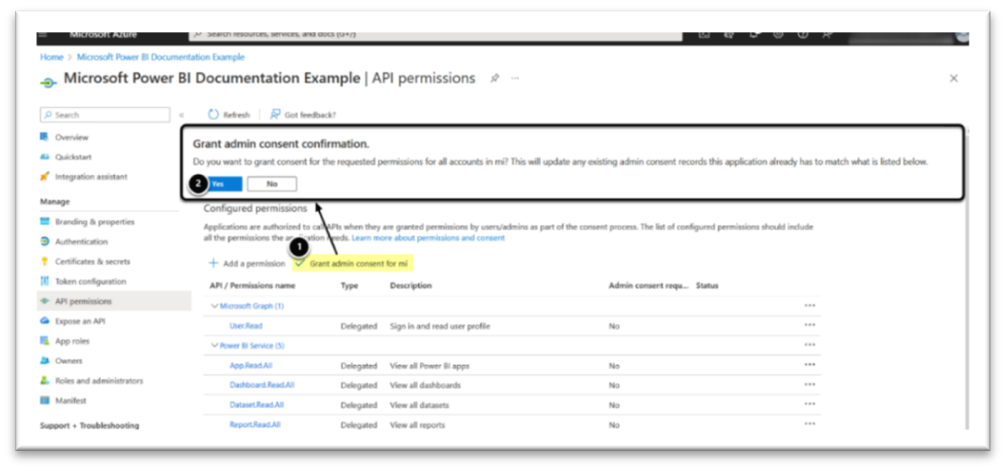
5). Grant Admin Consent
Once you configured the permissions, you can Grant admin consent confirmation and Select the Yes option
Now to move ahead with the process these steps must be taken into consideration:
What is OAuth?
OAuth or Open Authorization is an open standard for access delegation, commonly used as a way for internet users to grant websites or applications access to their information on other websites but without giving them the passwords. It got the ability to view content in iframes based on user account permissions rather than service account permissions.
Note: As we are building the connection using OAuth type, so we need to generate a client secret in the Azure Portal.
For generating the client secret, follow the below steps:
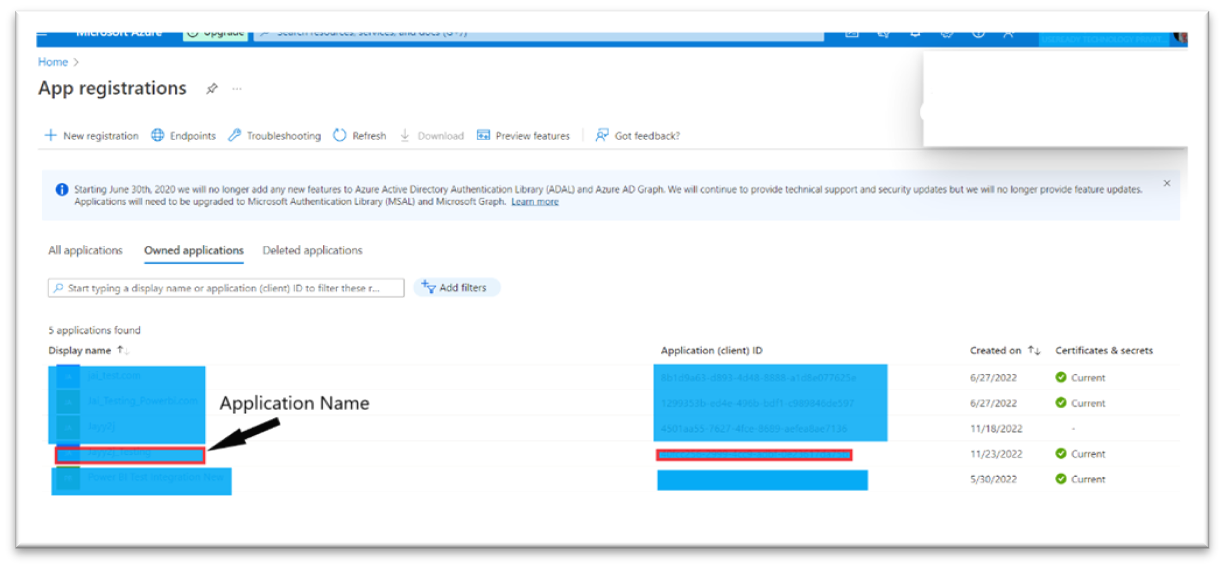
1). Access Microsoft Azure Portal
Once you open portal.azure.com move to the App registrations section, then click on the app that we have registered:
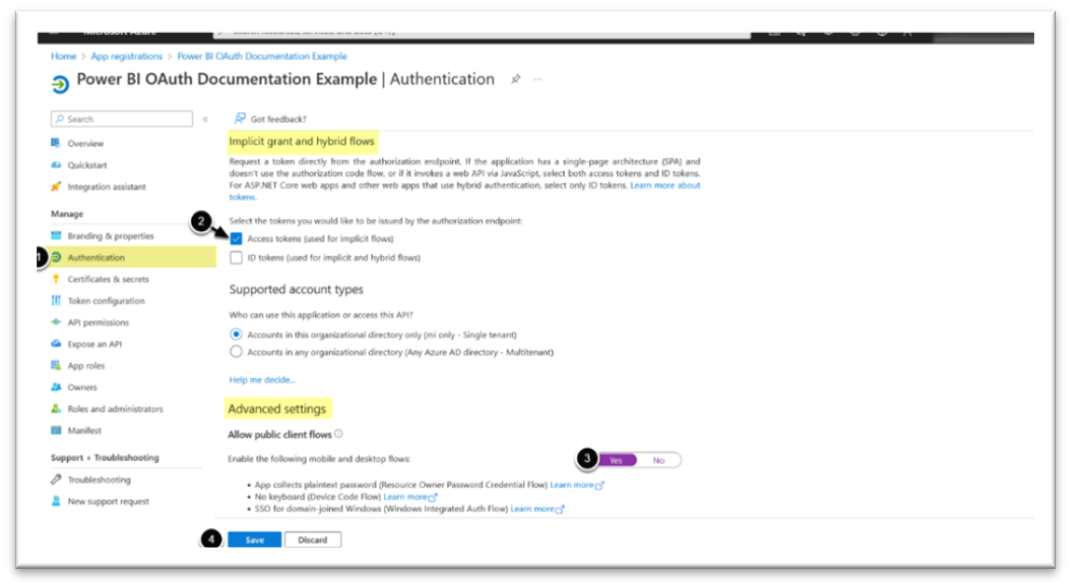
2). Configure Authentication
- In the manage section, go to the Authentication Tab
- In the Implicit Grant and hybrid flow section activate Access tokens (used for implicit flows)
- In the Advanced Settings section, set Enable the following mobile and desktop flows to ‘Yes’
- Click on the [Save]
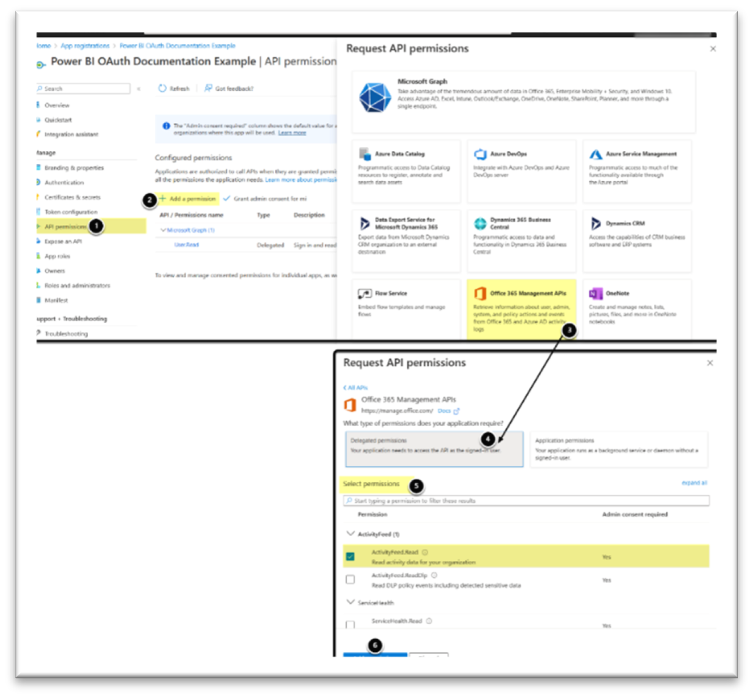
3). Add Office 365 Permissions
- After configuring Authentication, In the manage section click on the Access Permission tab
- Click on the [+ Add a permission]
- Now under the request API permissions select[Office 365 Management APIs]
- Select [Delegated permissions]
- Enable the following permission:
- Activity Feed: ActivityFeed.Read – This permission enables OAuth
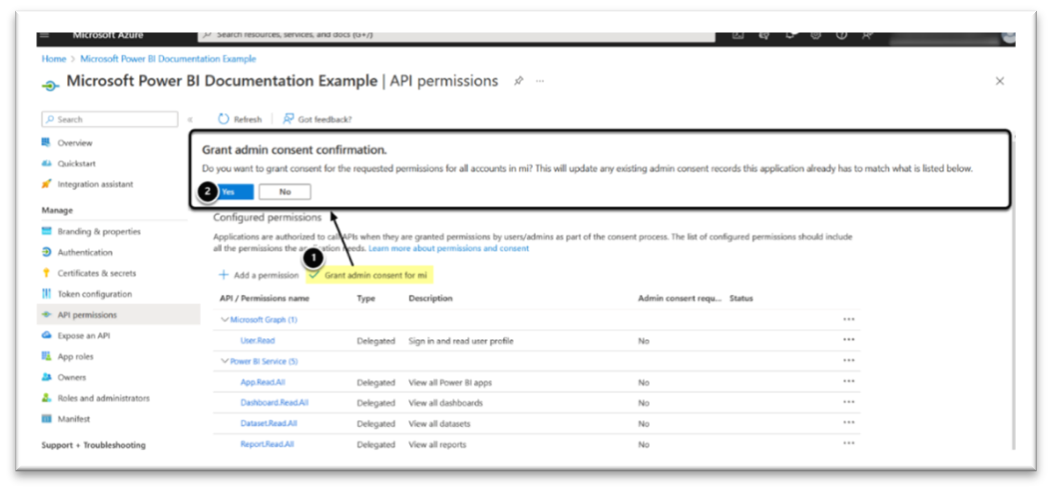
4). Grant Admin Consent
- In the Manage section, click on the API permission tab [Grant admin consent for <directory name>]
- Click [Yes]
Note: Adding Power BI Service Permissions is a mandatory step to proceed further, but we have already enabled the permissions in Step No. 4 of the Prerequisites section above. (Make sure you have enabled the permissions correctly for the further process)
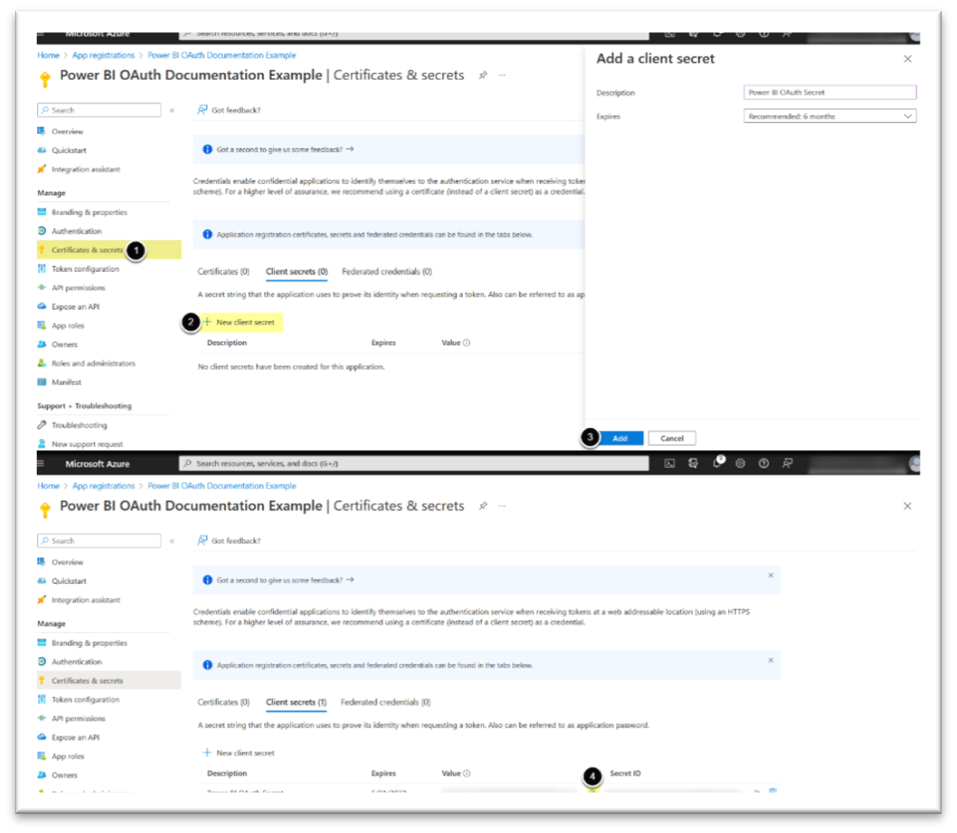
5). Add a Client Secret
- Under the manage section click on the Certificates & Secrets tab
- Now add[+ New Client Secret]
- Once you click on add a new client secret a pop-up window will appear asking for Description and Expires details which one can select according to the choice, and then click on Add
- Once you click on add, an auto-generated client value and secret id will appear, you have to copy the Client Value and save this value for further process
Building Connection in the Metric Insights Portal
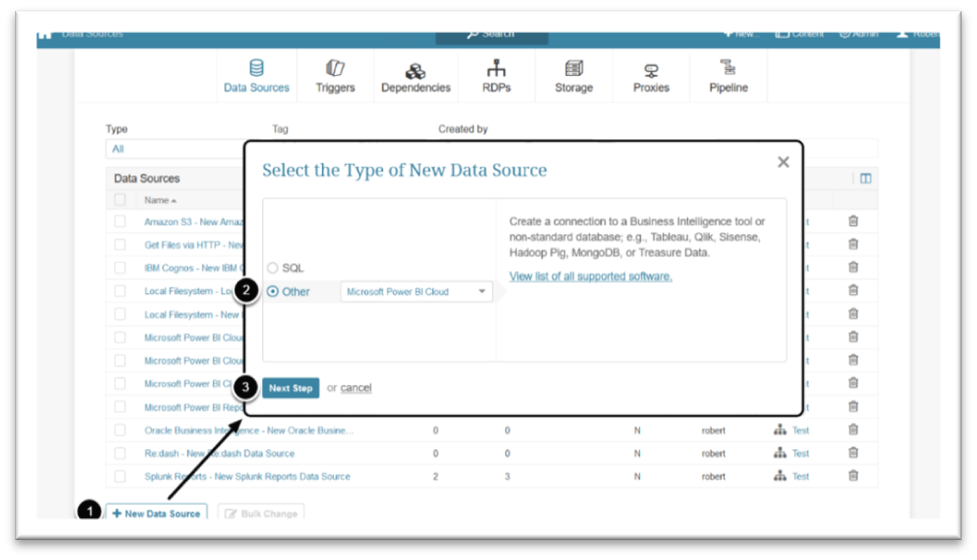
1). Create a New Data Source
Once you open the Metric Insights Portal, then on the top right corner
Under the Admin tab
1. Collection & Storage
2. Data Sources
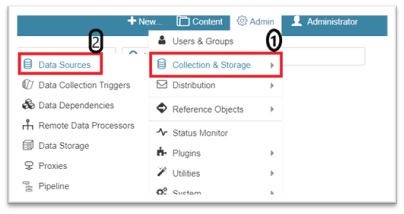
Now click on the new data source on the bottom left of the screen
- [+ New Data Source]
- Choose “Microsoft Power BI Cloud” from Other drop-down list
- Click on the [Next Step]
2). Provide the Required Parameters
a) Select the Auth Type: As this document covers, building a connection through OAuth type, we have to select OAuth in the Auth Type tab
b) Enter the Application ID of the registered Azure app that represents Metric Insights (to connect to Power BI)
c) Provide Client Secret Value that we have generated and copied ahead for further process
d) Server: the URL of your Microsoft Power BI server (this is the same URL that you see when accessing Microsoft Power BI via your web browser)
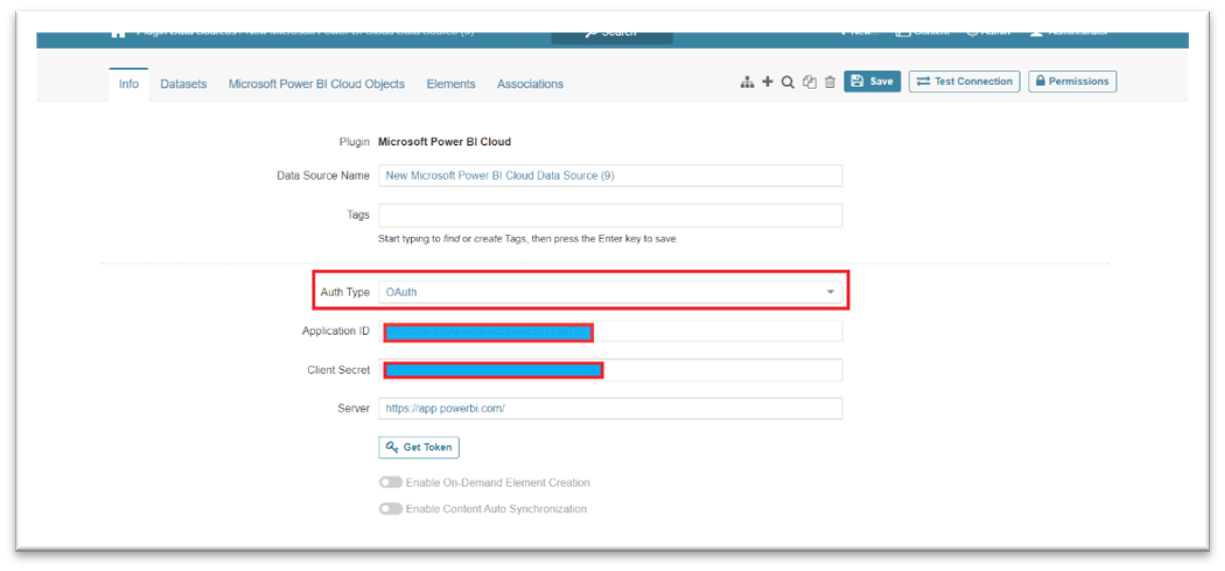
e) Click on the [Get Token]
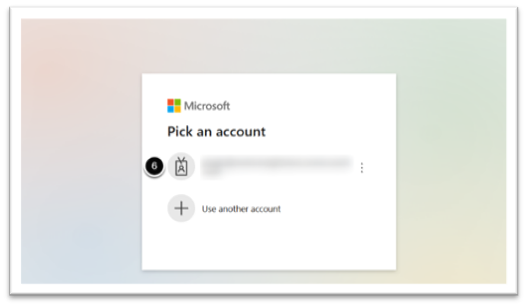
f) Authenticate with Power BI Service account with access to necessary workspaces
g) Once you scroll down, under the Optional Microsoft Power BI Cloud Parameters-
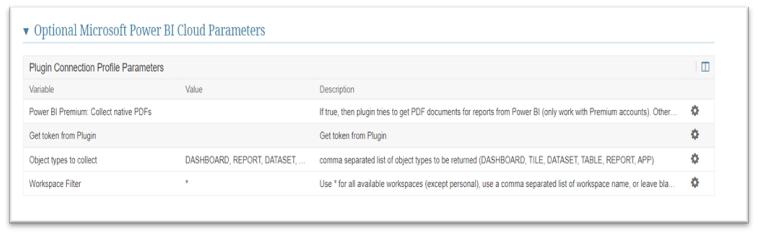
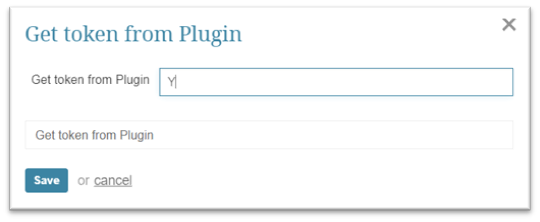
Click on the gear icon in the Get token from Plugin tab Type ‘Y’ (Tospecify whether the token used to display External Report images in iframes is fetched from plugin (“Y”) or in the UI (“N”) and click on save
Next Click on the gear icon in the Workspace Filter Type * ( The plugin will collect Power BI objects from all Workspaces the associated user has access to, except for My Workspace) and Click on Save

Note: As we are not using Remote Data Processor while building this connection, so we can skip the Advance Data Source Configurations settings
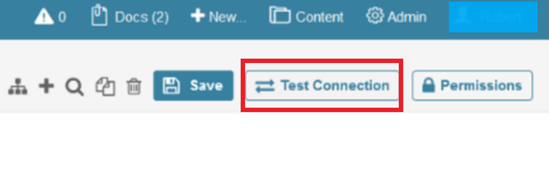
h) Finally, hit the[Test Connection] to check the successful connection (this will also save your entries)
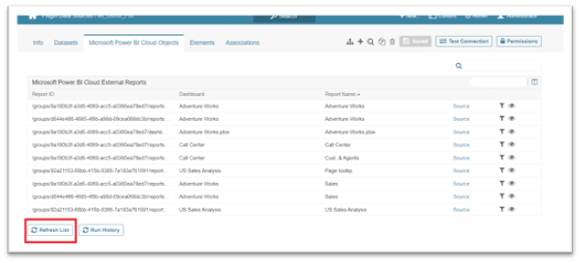
3). Microsoft Power BI Cloud Elements
Once you are done testing the connection, click on Microsoft Power BI cloud objects and hit the [Refresh list] option to see the updated objects (Dashboards, Reports, and Datasets) available in your Power BI cloud.