Anonymizing Sales Rep Data in CRM Analytics: A SAQL Tutorial
Protecting Individual Identities: Creating Anonymous Views of Sales Representatives
Safeguarding Privacy: Anonymization Techniques for CRM Analytics Data
Create Sales Rep Leader Board Dashboard
As a Sales Rep, I would always wonder about achieving greater targets and being at the top of my game by consistently working on my performance. But what if I want to see how my colleagues are doing and evaluate my performance against theirs? I want to look at how well I rank among my counterparts. Also, would my organization provide me with that sensitive data to create a report like that? Probably NO.
Understanding SAQL: The Key to Anonymizing Sales Rep Data
Step-by-Step Guide: How to Create an Anonymous View of Sales Reps in CRM Analytics
Can We Anonymise Sales Rep Information?
How about the organization anonymizes that data such that a logged-in Sales Rep can see his records while data for other Sales Rep stays undisclosed? And yes, that’s quite easily achievable in CRM Analytics dashboards. Let’s dive into developing this solution.
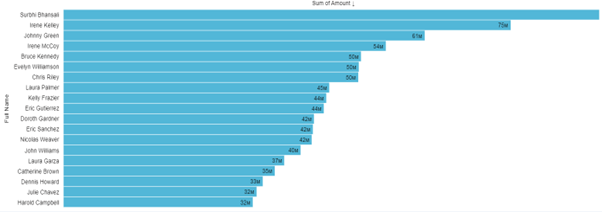
A pretty simple approach to see, how each Sales Rep is performing is to look at the revenue he has generated.
Best Practices for Data Privacy: Anonymization Strategies in CRM Analytics
Leveraging Salesforce Analytics: Enhancing Data Security with SAQL
Introduction to SAQL: What You Need to Know for CRM Analytics
Implementing Anonymization: Tips and Tricks for Protecting Sales Rep Identities
Enhancing Data Governance: The Role of Anonymization in Compliance and Security
Ensuring Data Confidentiality: Best Practices for Anonymizing CRM Analytics Data
But here I want to look at my numbers and anonymize the numbers for the other reps. For this let’s take 2 data streams :
- Logged-in User
- All other Users
Let’s start by creating a lens of a dataset. I created a simple recipe for this exercise by pulling data from Opportunity & User objects and joining the two input nodes to get the respective Opportunity Owner’s Full Name. You can use any other dataset as per their feasibility.
While building the lens I applied a filter to drill down only those opportunities that have been closed and won. And grouped my bars with Opportunity Owner’s Name. Let’s hop over to the SAQL section for creating the two streams we talked about.
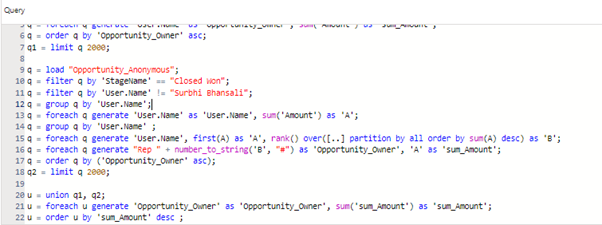
Currently, my SAQL code looks something like this.

Building Anonymous Leader Board
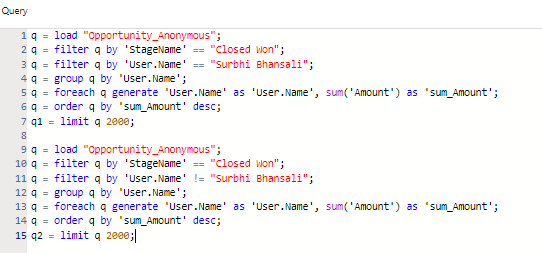
Now we need to add another filter to get only those records that are owned by me (You can leverage the name of the user from which you are currently logged in.) We will simply add one more line of code to filter my opportunities. (See line 3 of code below). Also, I am going to rename the stream q to q1.

To create another stream, all we need to do is copy the same code and change the filter criteria to fetch all other records, excluding My Opportunities. In the end, I am going to rename the final stream q to q2.
Our next step is to combine these two streams q1 & q2 and get the data into a single stream so we do not leave out any records. For this, we are going to make use of UNION (See line 17 of the code below)
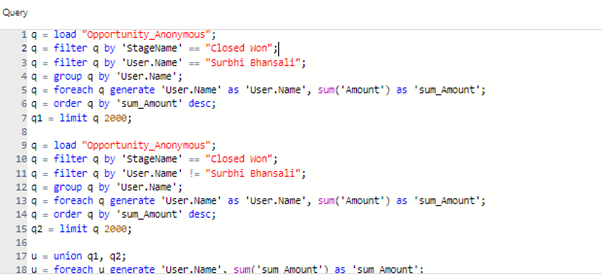
But our goal was to anonymous the other values in our dashboard, rather we created the same view.
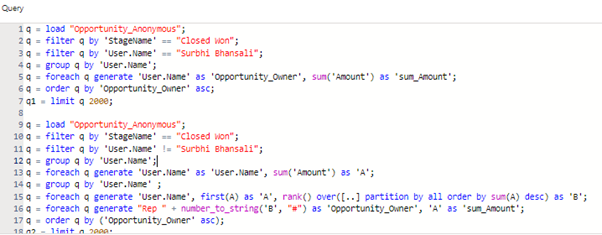
No worries we are on right track, just a few code changes need to be made in the q2 stream to hide the Sales Rep names by adding the windowing function – “RANK”. If you are well versed with SAQL you should be able to add the rank () function on stream q2, where we sort the data with Amount in descending order. This will rank the Sales rep based on the revenue they have closed. Another piece of code that needs to be added is to assign a random name to the Reps based on their ranking. The code will look like this

Let’s take a note here and see the group statement has been used twice here. Because we used the windowing function “Rank,” CRM Analytics needed to group twice, which allowed the rank function to perform calculations on the grouped rows.
Also if you are apprehensive to use SAQL for adding the rank(), you can start by setting up the lens the same way we did before, adding Opportunity Owner in the Bars section and adding the sum of Amount in the Bar Length. Don’t forget to add filters for ‘StageName’ == “Closed – Won.” This time, under the Bar Length, click the “+” and “Add Formula.” Click on the “f(x)” and select rank within the group. This will give a ranking to everyone in our table. We’ll leave all the defaults here, which will give us a new column called “Rank”. When you navigate to the SAQL section you will see the similar code we did above.
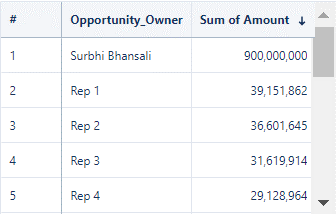
Great! We are almost done just. Let’s have a look at the entire code and output.
Output
Make it Dynamic!
Awesome, we have unnamed the rest of the Reps. One little thing left is to dynamically filter the logged-in user.
To accomplish this, let’s put the lens we just created on a dashboard. Now we will create a Salesforce Direct Query. To do this, click any blank space on the dashboard and then click “Create Query” in the top-right corner. Select Salesforce Object and type “User” Add a Full Name filter the way we did before only including “Surbhi Bhansali” and hit “Done.”
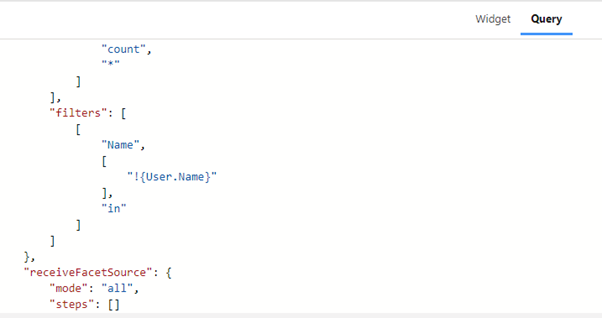
Currently, the query is trying to tell CRMA to filter the dashboard to capture just my information. We must make this dynamic. We need to dive into the advanced editor for that Salesforce Direct Query we just created. Click once on your query and select “Advanced Editor” in the top-right corner. Switch from the “Widget Tab” to the “Query Tab.” I will look for my name – Surbhi Bhansali and replace it with “!{User.Name}”. This function will tell CRMA to only look at the logged-in user when viewing this dashboard. Here’s a view of that modified Salesforce Direct Query:
Last but not the least, we have to tell the bar chart on the dashboard to do what our Salesforce Direct query is doing, filtering to the logged-in user. Click into the advanced editor on your bar graph, click the query tab, and find Surbhi’s name. This time in the advanced editor, because we’re in a SAQL query, we’ll need to type !\”User.Name\”. The backslashes tell Tableau CRM that these quotation marks are needed to read that user’s name as text, the same way we filtered for Surbhi Bhansali in SAQL earlier. See the code below

Voila, we are done. To validate I am going to login as someone else and see the same dashboard I built just now to see if this is working as expected.
So, when I am logged in as myself, my dashboard kind of looks like this. It shows other names in the random format we generated and displays my name.
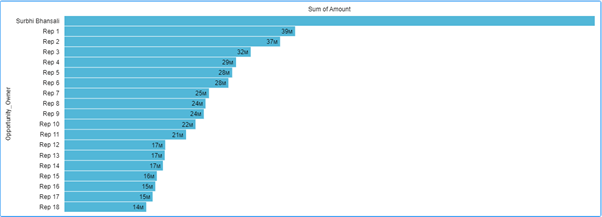
Later I logged in as Julie Chavez (the other sales rep) and went again into the dashboard. And as expected I should be able to see her name and other names as undisclosed. See the output below.
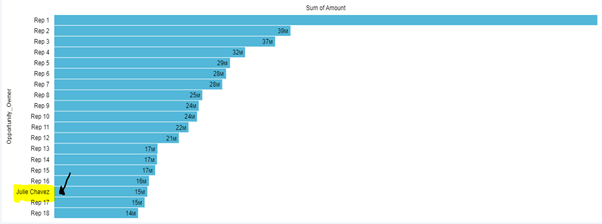
There we go with our anonymous leaderboard dashboard.
Filter Based on User Hierarchy
But this raises another problem. What if I am the manager and I have a few Sales Reps working under me? Assuming I don’t have any opportunities tagged to me, the reps I am managing are working dedicatedly to close the deals. If I look at the Leaderboard dashboard I created previously, that will showcase just the anonymous rep names, which ideally wouldn’t solve my purpose.
To handle this, we have yet another approach that can solve this issue. I am trying to build a solution wherein a manager logs into the system and gets a view of the opportunities he closed along with the opportunities closed by the team he manages. The other reps would stay anonymous to him.
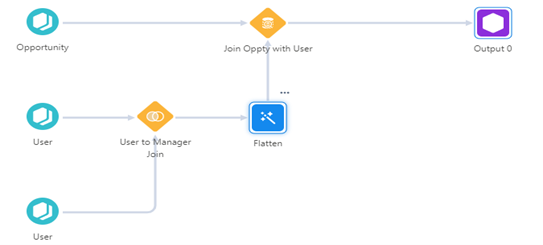
Sounds simple though. Let’s begin with amending the recipe I created earlier. This time I am going to add another join node. If you recall, we already had a joining node that links the Opportunity object with that to the User object to fetch the Owner Name. This time let’s add the self-join to the User object via the Manager id to get the hierarchy of each User we have in the system. The next step is to add the Flatten transformation to get the hierarchy of users and their respective managers into a column.
A flattened transformation gives you a list of all users who show up in a specific hierarchy. For example, if we use the flatten on the User’s Id, the flattened field will give you a value consisting of something like this: “User’s Id/Manager’s Id/Manager’s Manager’s Id.” We call this a path. To add this transformation, click on the transformation node following your manager to user join and select the “flatten” button from the top bar. See the below image to view the settings we have made.
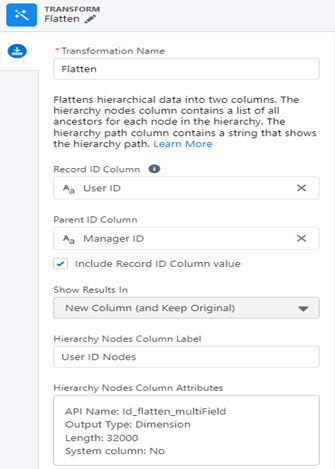
The final recipe looks like this. (See image below). I am going to save and run this recipe.
So far great. Now all I need to do is replace the logged-in user with that to the user hierarchy path we just created in the recipe. First, let’s look at the Salesforce Direct Query we created in the previous exercise. Earlier we had “!{User.Name}” to filter the logged-in user dynamically. This time we are going to change this to “!{User.Id}”. The reason we are replacing the name with an ID is that we are now going to filter based on the hierarchy path column which contains User’s ID.
Next, we are going to replace ‘User.Name’ == \”!{User.Name}\” in the query of bar chart to (‘User.Id_flatten’ matches \”!{User.Id}\”).
Also make sure to use (‘User.Id_flatten’ matches \”!{User.Id}\”) for logged in user and !(‘User.Id_flatten’ matches \”!{User.Id}\”). for all the other users.
Our new query is looking at whether the logged-in user falls in the hierarchy of the logged-in Sales Rep or not. Enabling this change will let the Reps view the users they manage in the leaderboard dashboard while keeping the rest of the bars anonymous.

And it’s done! Let’s look at how are dashboard looks now. For now, I am logged in as myself and see the dashboard view below and three names highlighted in yellow. This conveys that users – Laura Garza & Julie Chavez are managed by me.
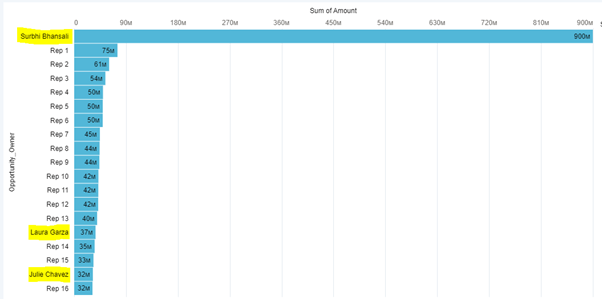
Now let’s try logging in to some other user say Laura Garza this time and see if she has any team she manages and her revenue numbers.
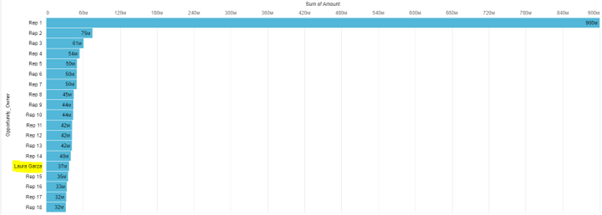
Looks like Laura doesn’t have any users that she manages, therefore other reps appear anonymous to her.
Awesome! It seems now we have a well-rounded solution for all.


