Exploring Streamlit: An In-Depth Guide to Building Web Applications
Harnessing the Power of Streamlit for Data Visualization and Beyond
Mastering Streamlit: Tips and Tricks for Building Interactive Applications
What is it?
Streamlit is an open-source Python framework that allows you to create beautiful interactive websites for Machine Learning and Data Science projects without needing to have any web development skills.
Streamlit achieves this by allowing us to create a website by only adding a few Streamlit function calls to existing python projects/experiments.
After adding the function calls, Streamlit will display all the selected items, watch for any changes inside the script, and update the website accordingly.
Understanding the Basics of Streamlit: Getting Started with Python Web Development
Building Interactive Data Applications with Streamlit: Step-by-Step Tutorial
Streamlit supports displaying text, data, code, lots of interactive widgets, and many charting libraries including Matplotlib – for basic plotting – and Vega-Lite, deck.gl and Plotly for interactive graphs.
Streamlit has multiple features like text elements, data display elements, chart elements, input widgets, media elements, layout & containers, status elements and components.
Advanced Streamlit Techniques: Enhancing Your Web Applications with Custom Components
Streamlit Deployment and Integration: Best Practices for Seamless Implementation
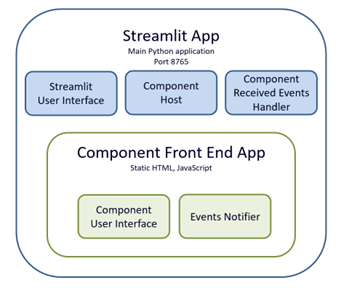
Streamlit Components lets you expand the functionality provided in the base Streamlit package by enabling you to write JavaScript and HTML components that can be rendered in Streamlit apps. Streamlit Components can receive data from Streamlit Python scripts and send data to them when initially loaded. Streamlit Components have two parts:
- A frontend which is implemented in any JavaScript Framework you prefer (React, Vue, etc.) and gets rendered in Streamlit apps via an iframe tag.
- A Python API which Streamlit client apps use to instantiate the frontend and communicate with it.

Getting Started with Streamlit: Installation and Setup Guide
Creating Your First Streamlit Application: A Beginner-Friendly Tutorial
Why should I use this?
- To build a good front-end for Python data science project as quickly as possible, Streamlit is the perfect choice.
- Streamlit has inbuilt API features/libraries to support creating the web app easily as per our requirements with less coding (Which does not need our in-depth programming knowledge).
- Streamlit’ s API design is equally elegant.
- Streamlit re-runs the whole Python script whenever any app state changes. This enables an impressive level of interactivity without the need for custom call-back functions.
- Data caching method simplifies and speeds up the computation pipelines.
- Streamlit will become a Native Application Framework in snowflake.
- To know more about data apps, check out this link https://www.useready.com/blog/data-apps-demystified/
Leveraging Streamlit for Data Visualization: Tips and Tricks for Effective Design
Streamlit Extensions and Integrations: Expanding the Functionality of Your Applications
What are the features ?
Ease of Use:
Streamlit’s API enables users to create widgets using pure Python without having to worry about back-end code, routes, and requests. The st.write() function simplifies the rendering of data in the browser.
Design Flexibility:
As the framework is currently young and focuses primarily on ease of use, it is not entirely flexible in its layout options. In saying that, there are functions such as sidebar, columns, and expander which offer some layout control. You can place widgets and inputs in the sidebar to not clutter your application interface. You can use columns to create columns in your application to place items side-by-side, and likewise expander enables you to conserve space by hiding content in clickable dropdowns
What are the limitations?
- build complex interactive patterns. No way to define custom call-back functions.
- Limited control over layout.
- Streamlit’ s Data caching cannot keep track of changes to the data happening outside the function body.
- Lack of design flexibility and control over your application layout.
- Layout options are limited with Streamlit
- The only obvious way to organize content is in columns and on the built-in sidebar.
- Streamlit Sharing is limited. Developers are limited to 3 apps, even for open-source projects. Apps run on a single CPU with less than 1GB of RAM and storage, so many modern machine-learning use cases are not feasible
- The Streamlit framework does not currently include any authentication mechanisms. The workaround, for the time being, is to apply authentication mechanisms to the server hosting your deployed Streamlit application.
How do I deploy? Where do I deploy?
Streamlit Cloud lets you deploy your apps in just one click, and most apps will deploy in only a few minutes
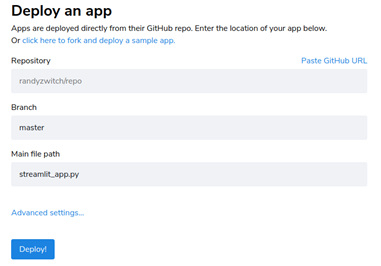
Streamlit Cloud launches apps directly from your GitHub repo, so your app code and dependencies need to be on GitHub before you try to deploy the app.
To deploy an app, click “New app” from the upper right corner of your workspace, then fill in your repo, branch, and file path, and click “Deploy”.

Here is the link to deploy streamlit on different cloud environments https://docs.streamlit.io/knowledge-base/deploy/deploy-streamlit-heroku-aws-google-cloud


 Media Coverage
 Press Release
