
Mastering Alteryx Basics for Efficiency
Unlocking Alteryx’s Full Potential
Beginner’s Guide to Working Efficiently with Alteryx
Why Alteryx is Ideal for Data Preparation
Quick Wins for Alteryx Beginners
Enhancing Workflow Efficiency with Alteryx
Best Practices for Alteryx Users
Understanding Alteryx Tools and Features
Common Mistakes Beginners Should Avoid
Tips to Optimize Data Blending in Alteryx
Leveraging Alteryx for Better Data Insights
Working with Alteryx doesn’t have to be complicated. Whether you’re building data workflows or automating complex processes, knowing the right techniques can drastically improve your efficiency and productivity.
In this comprehensive guide, we’ll explore 12 Alteryx tips that will transform you from a beginner to a confident power user. These techniques will help you save hours of development time while creating more robust and maintainable workflows.
Tip 1
Workflow Runtime Options
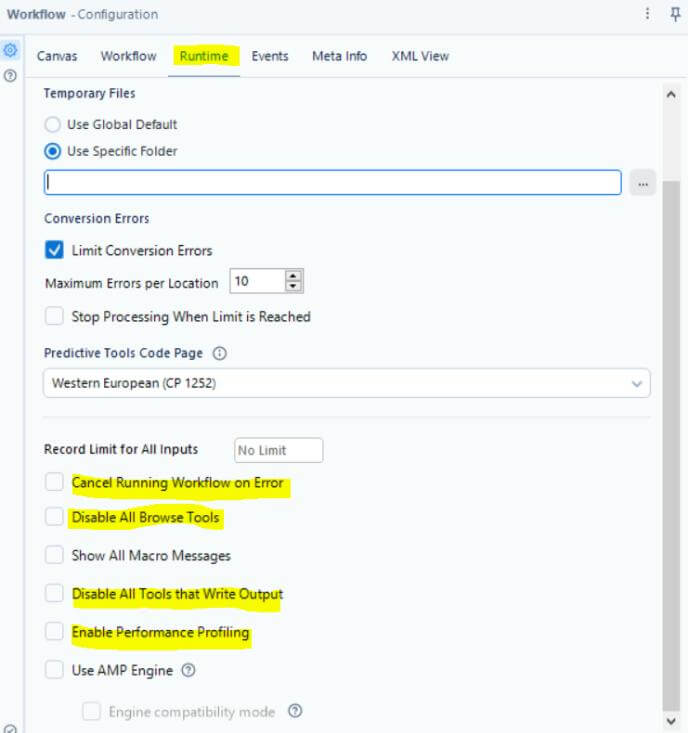
There are a few options under the runtime menu of a workflow which are very useful when developing a workflow or debugging. It helps to save a lot of time and effort as a developer.
Disable All Tools That Write Output: It prevents any tools in the workflow from writing output to files, databases, or other destinations. It is very useful when you want to test the workflow without creating or updating any output.
Disable All Browse Tools: This disables all browse tools in the workflow in a single click to speed up the execution of the workflow. It’s also a best practice to keep them disabled when publishing them to workflow.
Enable Performance Profiling: When enabled, it records the performance of each tool in the workflow and shows them in the form of % in the result log pane so that you can identify the tool which is taking more time compared to other tools and helps to optimize the workflow.
Cancel Running Workflow on Error: It terminates the workflow execution whenever the workflow encounters an error. It’s best practice to keep it enabled so that the workflow which contains error won’t write any partial output to destination which cause unreliable data.
Tip 2
Cache and Run Workflow
Everyone loves a workflow that takes less time when developing or debugging. This is a powerful option for improving workflow development efficiency by allowing the users to cache data at specific points in a workflow. This way you don’t need to reload the data every time you make a change. For example, if you have a workflow that contains complex steps in the initial section, you can cache the data until those steps and make changes in the remaining tools. This will improve the speed and reduce the computation resources needed by Alteryx.
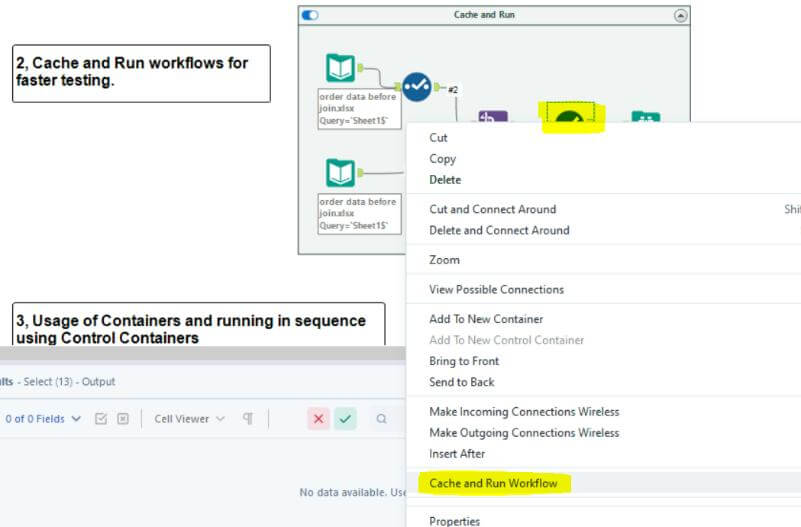

To enable this option, you need to select the tool which you want to cache and right-click after which you will see an option called “Cache and Run Workflow”. When you click this option, Alteryx will cache all the tools prior to the selected tool and create a cache point. And the next time you run the workflow; it will take the data from that cache instead of re-loading entire complex steps again. Also, if you make any changes in the cached tool, Alteryx will automatically remove the cache and reload it.
That said, please note that any changes to the input files will not come into effect when you run with this option. To extract latest input files, you will have to clear cache by right-clicking on the same tool you cached and select “Clear Cache”
Tip 3
Formula Save Expressions feature
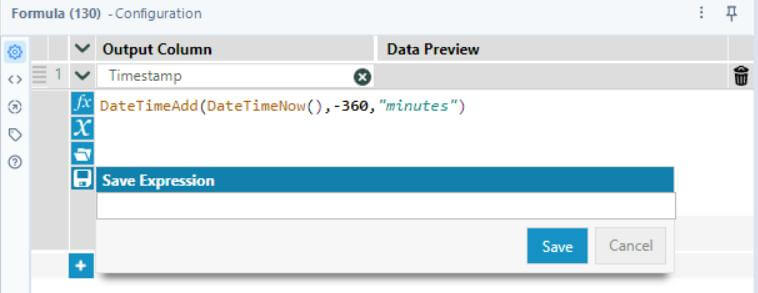
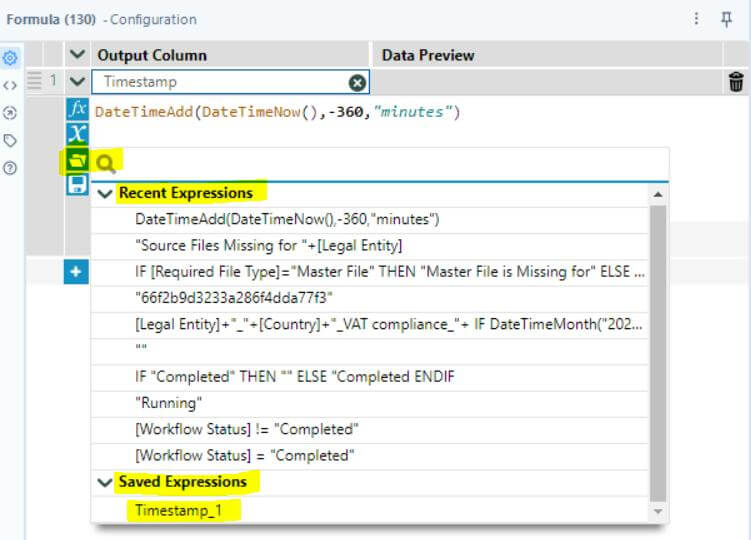
It helps to save and re-use the same expression using Formula tool anywhere in the Alteryx designer. It is very helpful when you have repetitive expressions that need to be used in multiple workflows. For example, when you want to show the timestamp in all your workflows, you can write this expression once and save it. We can use the same by opening the expressions section in the formula tool instead of writing it again and again, saving plenty of time.

Tip 4
Usage of Find and Replace
It’s a powerful feature that allows developers to perform data cleansing, debugging, standardization and transformation tasks.
To open this pane, you can click on CTRL + F or you can look for find and replace pane at the left-hand side of the designer.
It contains two tabs. First is the “Find” which lists all the tools by their Tool Id and Name. We can sort it based on Tool Id or Name by clicking on the header. It’s helpful in case you want to see the particular tool, which is giving error on server, instead of looking for them manually on the canvas.
Second is the “Replace”, where we can search for any text on the workflow and replace it with any other string as per requirement.
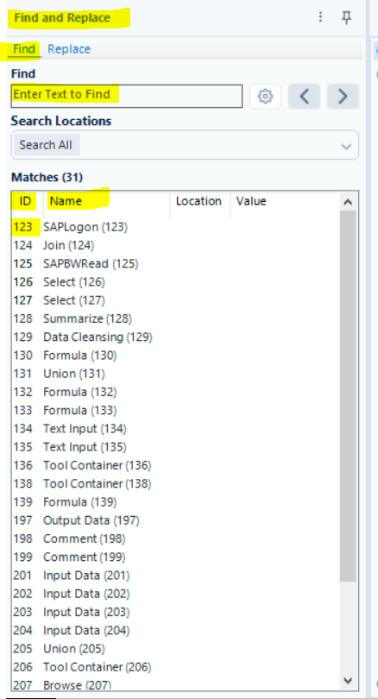
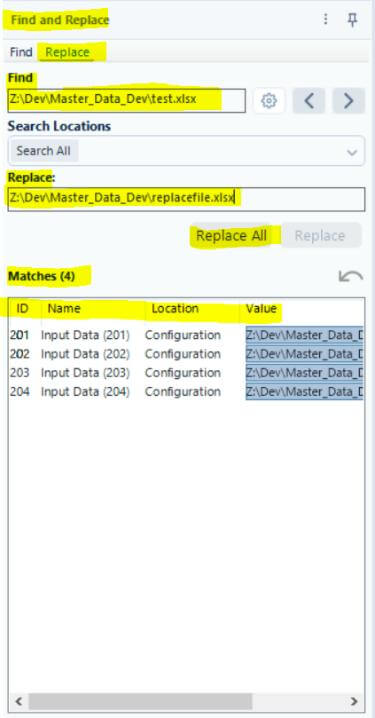
For example, we need to replace the old file path with new one. But workflow contains many inputs tool reference to the old path which makes things difficult. By using the “Replace” function, we can do this easily with just a few clicks. Just past the old path in the find section under “replace” and click on search and provide the latest path and hit replace.
Tip 5
Cut/Delete and Connect Around Shortcut
This shortcut allows you to cut/delete a tool in a workflow without breaking the upstream and downstream connections automatically. This is extremely useful when you need to cut/delete a tool which is connected to many other tools without breaking the data flow. This avoids manually reconnecting the tools which reduce the chance of workflow errors.
To use this shortcut, right-click on the tool you want to cut/delete. You will see two options like “delete and connect around” for deleting and “cut and connect around” for cutting the tool and re-using the same somewhere else.
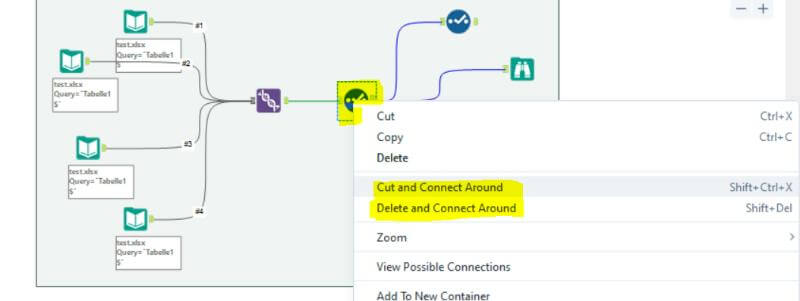
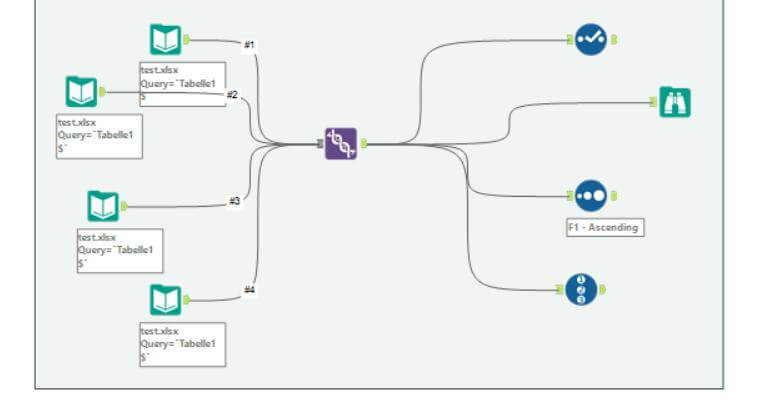
Keyboard shortcut: Ctrl + Shift + X
Tip 6
Adding Multiple Browse Tools Shortcut
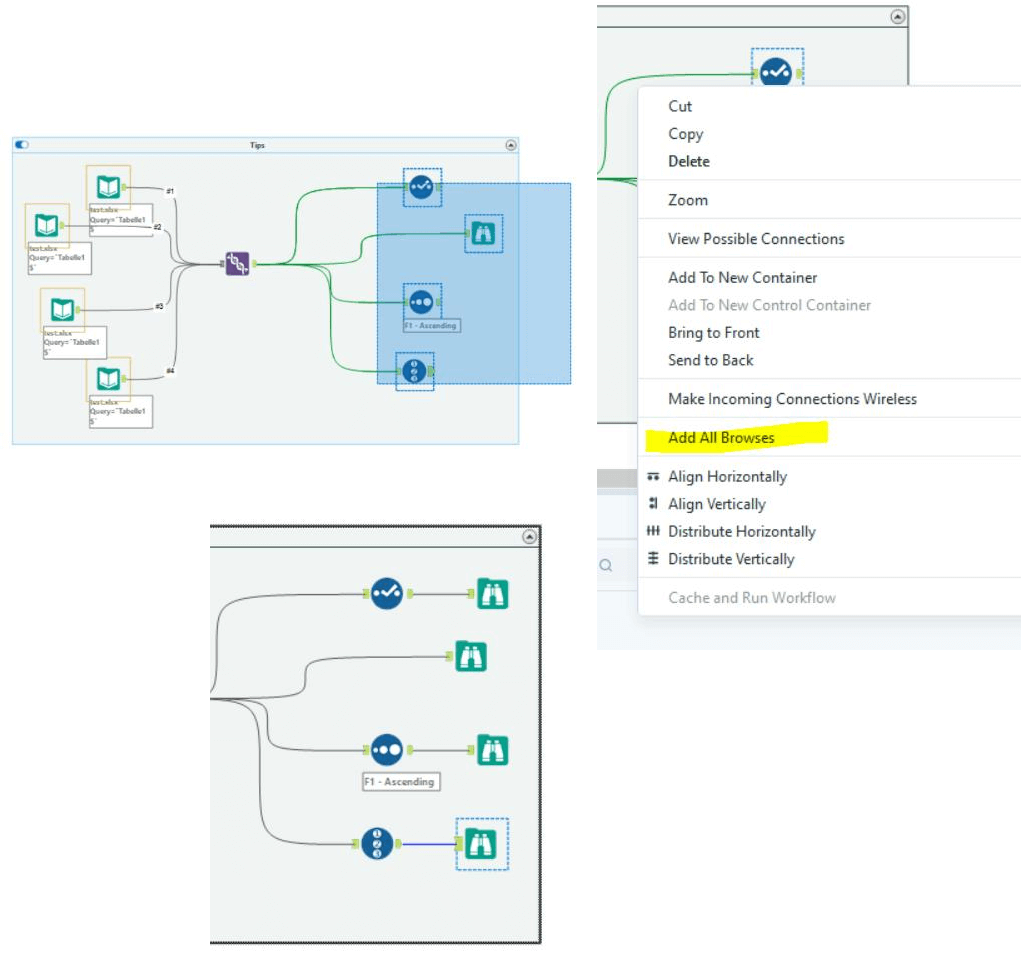
This shortcut is useful when you are debugging a workflow to find the root cause of the problem. There are various ways to add browse tools but in case you need to add browse tool to multiple places and tools, know that it is very time-consuming. To overcome that, we can use this shortcut.
To use the shortcut, select the tools by holding the CTRL button and right-click on one of the tools, where you can see the option “Add All Browse”. This option will connect the browse tool to all the tools selected.
Tip 7
Usage of Documentation Tools – Comments and Annotation
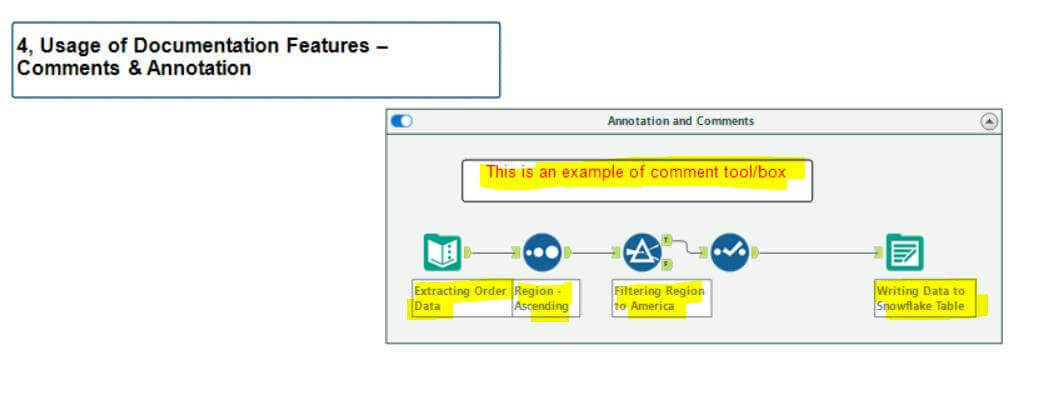
Most of the time developers have to work on workflows which were developed by others. And it’s something one just can’t avoid. Comments and Annotations are one of the lifesavers in situations where you can provide short description of the tools or the sections so that the next developer is able to understand the workflow.
By default, Alteryx provides basic tool annotations which can be modified by a custom annotation.
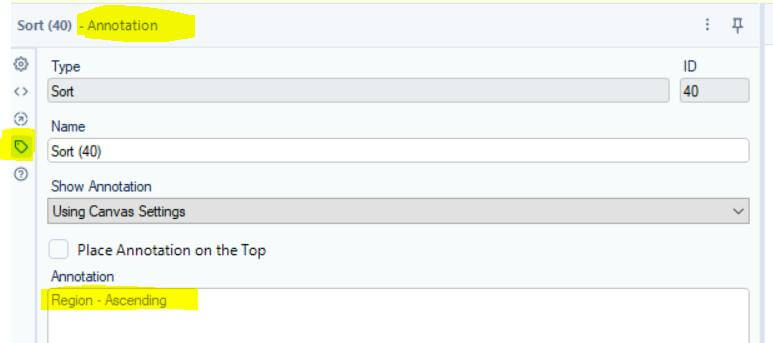
For that, select the tool, and open the configuration pane. In the Annotation tab of the Configuration pane, there’s a box where you can add a custom annotation. You can choose to display this annotation next to the tool in the workflow or keep it in the configuration pane.
There is a dedicated tool provided by Alteryx for providing comments, and it’s called “Comment” tool. You can drag and drop the tool and provide lengthy descriptions which will be helpful to understand the complex transformations etc.

Tip 8
Usage of Tool Containers and Control Containers
In Alteryx, Tool and Control containers are used to organize, manage and control the execution of the logical flow of the data.
Tool Containers, as the name suggests, are used as containers for other tools to group together. It provides few additional features like enabling and disabling container while executing without removing them from the workflow.

To use this, drag the tool container from Documentation category. Select the tools you want to group and drag and drop them in to the container. You can also select the tools and right-click and click on “Add to New Container” grouping the selected tools inside a new container.
Tip 9
Events and Email Notifications
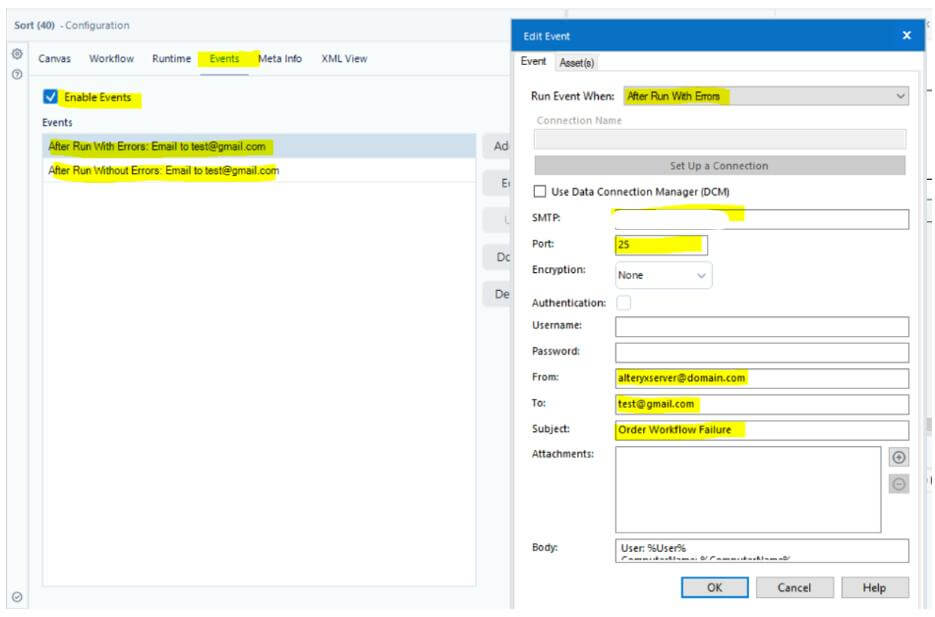
This is a crucial step to know the status of the ETL process. Whether the process failed or succeeded, it’s important to know the status as soon as it is completed so that we can take necessary actions such as informing end-users or run the downstream commands or programs. Alteryx provides two methods to notify about the process.
In Email Event, we can configure email events in workflow to notify the user about the status of workflow. To enable this, open a workflow in Alteryx, then go to the Events tab in the Workflow – Configuration panel. Click on the Add button to add a new event.
Triggers for Events:
After Run: Trigger an event after the workflow is complete (regardless of success or failure).
On Success: Trigger an event only when the workflow successfully completes.
On Failure: Trigger an event when the workflow fails.
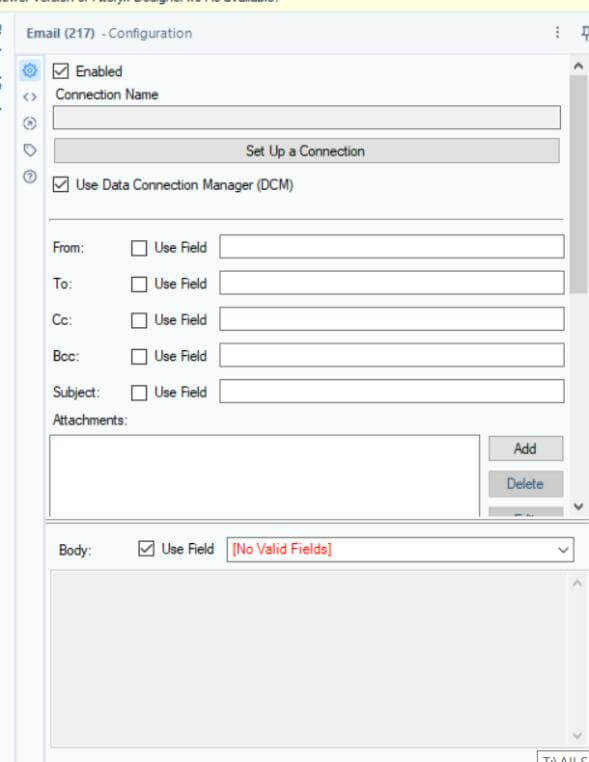
Another option is using the “Email” tool provided by Alteryx; we can notify users about the status inside any part of the workflow. You can connect to this tool like any other tool and configure the email settings like server, subject, body, to address, from address etc.

Tip 10
Workflow Comparison
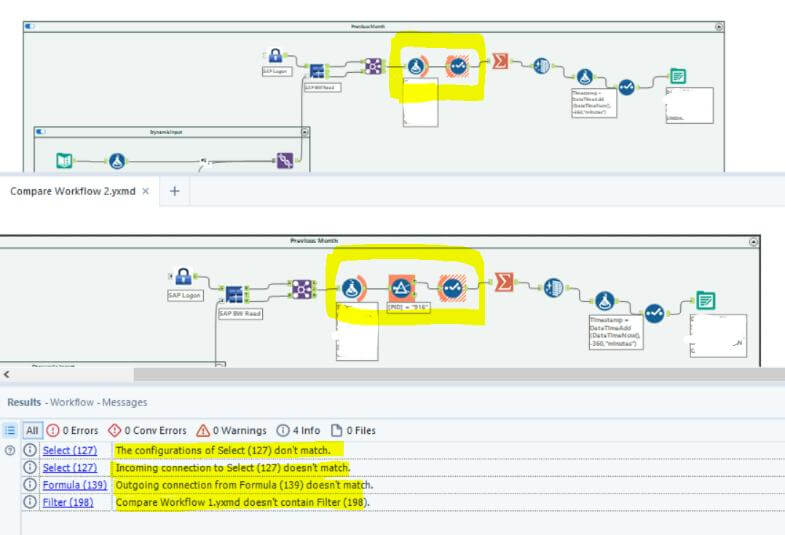
It allows users to compare two workflows to identify the differences like changes in the configuration, addition/removal of tools, connections, and metadata. This is useful when troubleshooting, version control or auditing changes between workflow versions.
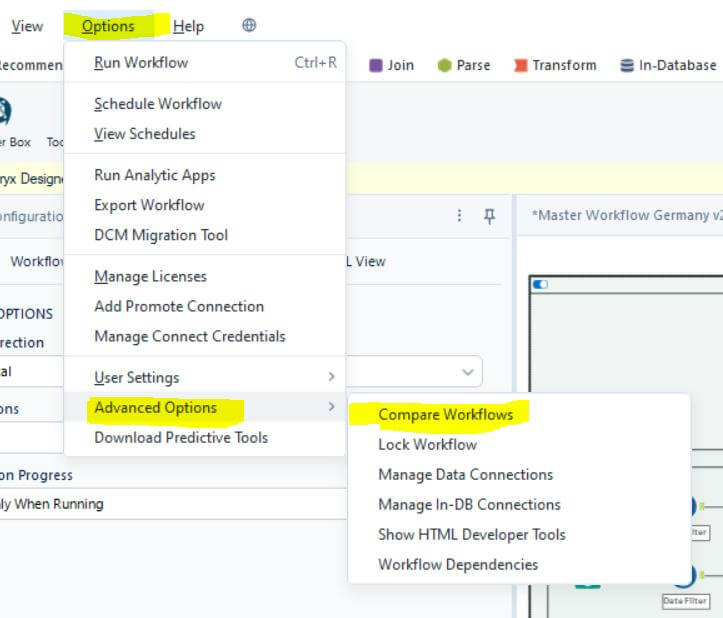
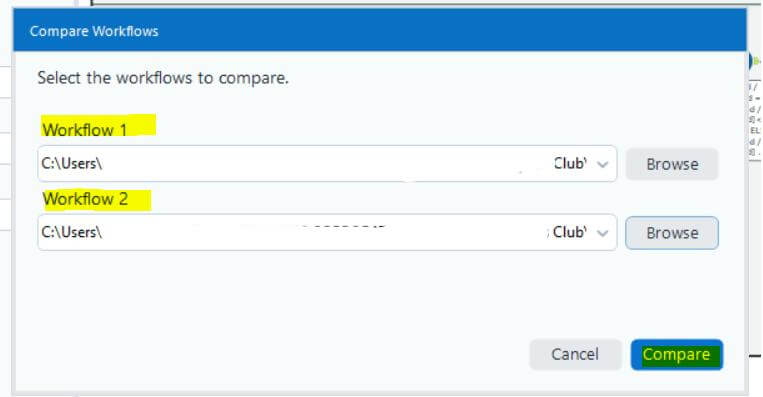
To make comparison, you need to go to options menu at the top, advanced options and click on compare workflows. Next pop-up window will ask you to select both workflows and you need to click on compare to see the comparison results.
Result:
Tip 11
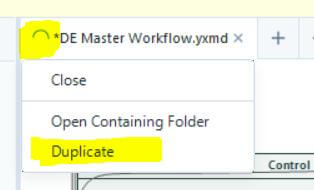
Duplicate the Workflow
We all know how to duplicate a workflow; the native way is to go to file explorer and copy and paste the workflow. Instead, we can duplicate the workflow from Alteryx itself by clicking on the workflow name on the workflow navigation pane and hit duplicate. Another cool thing about this is that you can duplicate the workflow even if the workflow is in running state. So that you can look at another issue or configuration in the same workflow simultaneously
Tip 12
Keyboard Shortcuts
Using keyboard shortcuts in Alteryx can significantly enhance your efficiency and streamline your workflow development process. Here’s a list of commonly used keyboard shortcuts in Alteryx, organized by category:
CTRL+R                     Run workflow
CTRL+O                     Open workflow
CTRL+Z                     Undo Action
CTRL+Y                     Redo Action
CTRL+SHIFT+ ’+’            Align Vertically
CTRL+SHIFT+ ’-’            Align Horizontally
CTRL+SHIFT+B               Add all browses
CTRL+F                     Find tool within workflow
CTRL+S                     Save Workflow
CTRL+SHIFT+A               Add annotations
CTRL+SHIFT+A               Add Comment Tool
CTRL+C                     Copy Tool
CTRL+X                     Cut Tool
CTRL+V                     Paste Tool
These 12 Alteryx tips are just the beginning of your journey toward becoming an Alteryx expert. By incorporating these techniques into your daily workflow development process, you’ll not only save valuable time but also create more efficient and maintainable solutions. Remember to practice these tips regularly, and don’t hesitate to explore Alteryx’s additional features as you become more comfortable with these fundamentals.


 Media Coverage
 Press Release
